Introduction
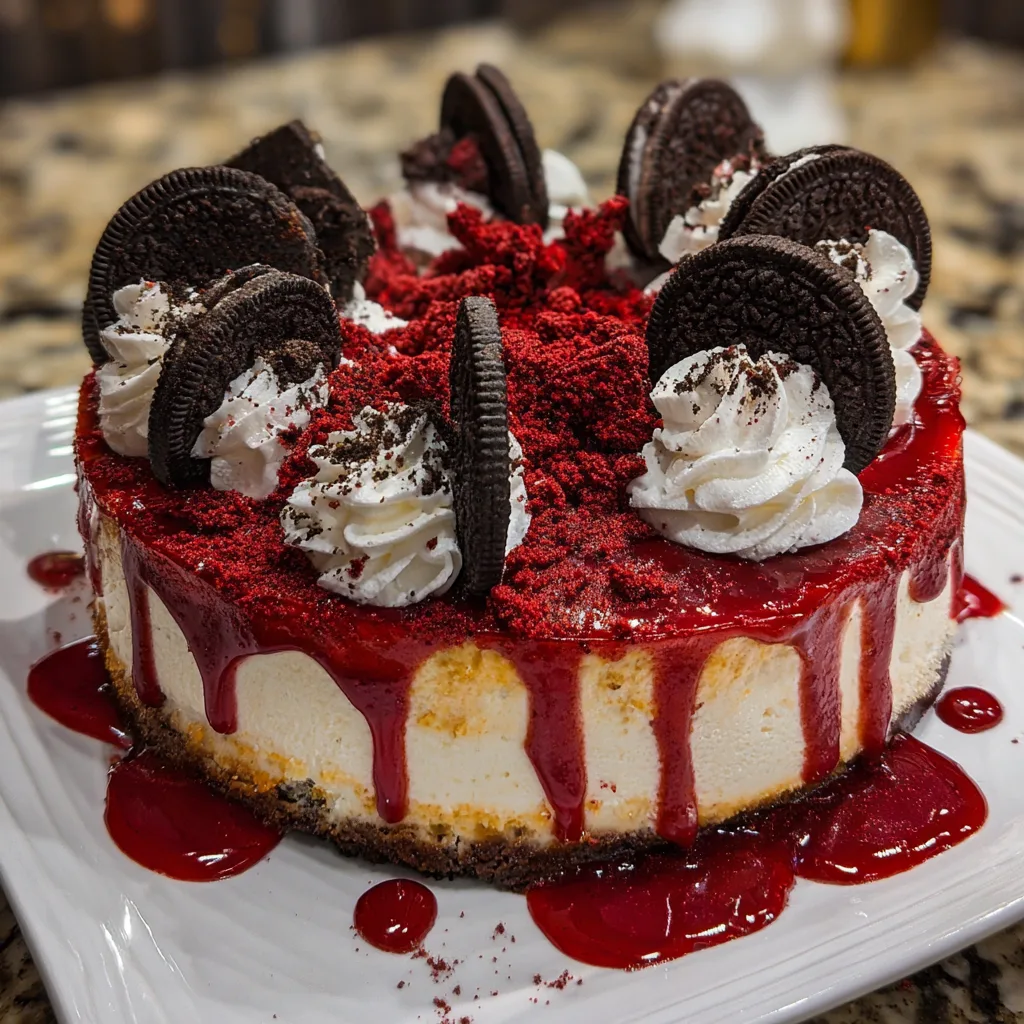
Red Velvet Oreo Cheesecake is a show-stopping dessert that blends three beloved classics into one indulgent treat. The subtle cocoa flavor of red velvet cake, the creamy richness of cheesecake, and the crunch of Oreo cookies come together in perfect harmony. This is the kind of dessert that immediately feels special, making it ideal for celebrations, holidays, or anytime you want to impress. What I appreciate most about this recipe is how balanced it is despite its richness. The cheesecake layer is smooth and not overly sweet, while the Oreos add texture and contrast. When I first made this cheesecake, I was surprised by how cleanly it sliced after chilling, which made it look just as good as it tasted. If you enjoy bold, layered desserts with visual appeal and deep flavor, this Red Velvet Oreo Cheesecake is a must-try.
Print
Red Velvet Oreo Cheesecake: A Decadent Dessert with Bakery-Style Flair
- Total Time: 1 hour 25 minutes (plus chilling)
- Yield: 12 servings
- Diet: Vegetarian
Description
Red Velvet Oreo Cheesecake is a decadent dessert combining a rich red velvet cheesecake filling with a crunchy Oreo crust and creamy layers, perfect for celebrations and special occasions.
Ingredients
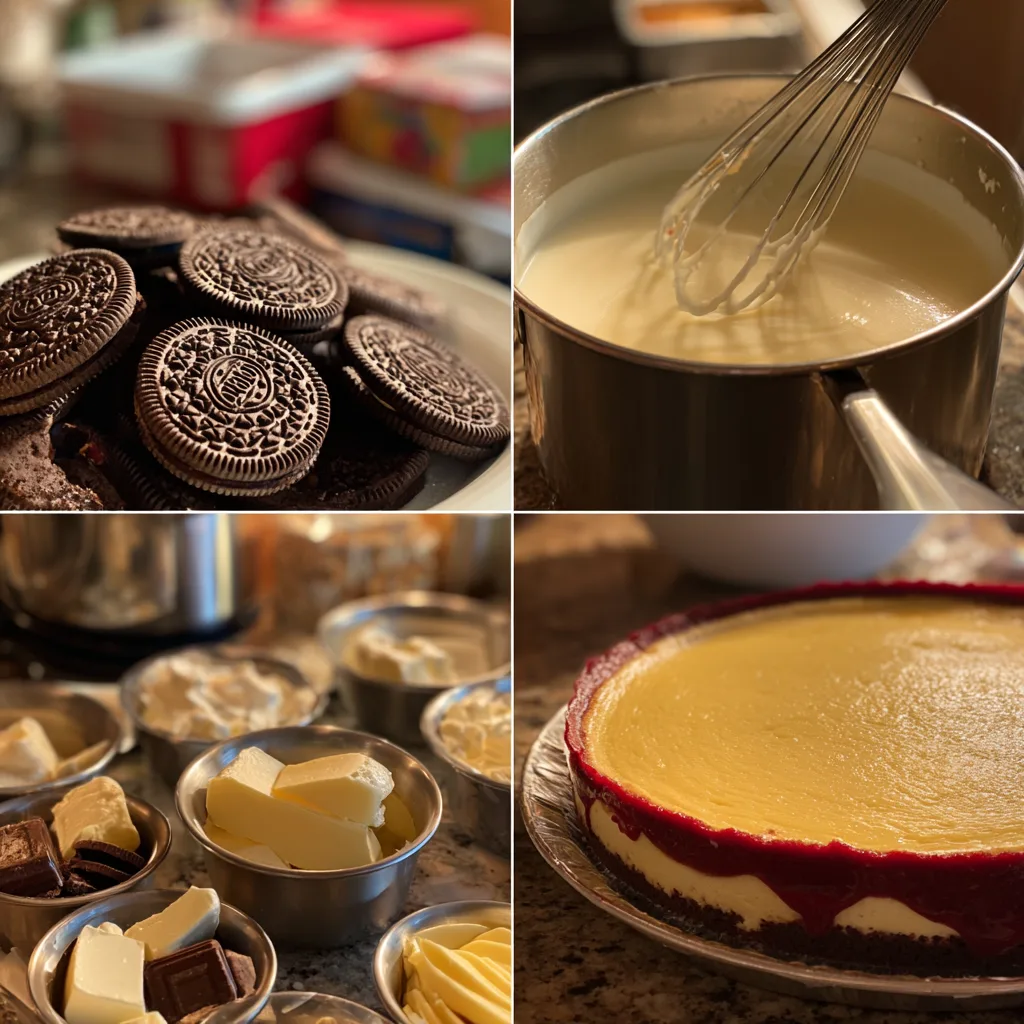
- 24 Oreo cookies, crushed
- 5 tablespoons unsalted butter, melted
- 3 (8 oz) packages cream cheese, softened
- 1 cup granulated sugar
- 3 large eggs
- 1 cup sour cream
- 1/4 cup cocoa powder
- 2 tablespoons red food coloring
- 1 teaspoon vanilla extract
- 1/2 teaspoon salt
- 1 cup crushed Oreo cookies (for filling)
- 1/2 cup whipped cream (optional topping)
Instructions
- Preheat the oven to 325°F (165°C).
- Mix crushed Oreo cookies with melted butter and press firmly into the bottom of a greased springform pan.
- Bake the crust for 10 minutes, then remove and allow to cool.
- In a large bowl, beat cream cheese until smooth and creamy.
- Add sugar and mix until fully combined.
- Beat in eggs one at a time, mixing just until incorporated.
- Add sour cream, cocoa powder, red food coloring, vanilla extract, and salt. Mix until smooth.
- Fold in crushed Oreo cookies.
- Pour the cheesecake batter over the cooled crust.
- Bake for 55–65 minutes, until the center is just set.
- Turn off oven, crack the door, and allow cheesecake to cool inside for 1 hour.
- Refrigerate for at least 4 hours or overnight before serving.
Notes
- Do not overmix the batter to avoid cracks.
- Use a water bath for an extra smooth texture if desired.
- Garnish with whipped cream and additional Oreos before serving.
- Prep Time: 25 minutes
- Cook Time: 1 hour
- Category: Dessert
- Method: Baking
- Cuisine: American
Why You’ll Love This Recipe
This cheesecake is rich, creamy, and visually striking. It combines familiar flavors in a way that feels indulgent without being overwhelming. The Oreo crust adds crunch, the red velvet layer brings subtle chocolate notes, and the cheesecake filling ties everything together. It is perfect for make-ahead baking, serves a crowd, and always earns compliments.
Ingredients
(Tip: You can find the complete list of ingredients and their measurements in the recipe card below.)
Oreo cookies form the base of the crust, providing a chocolatey crunch that contrasts beautifully with the creamy filling.
Butter binds the crushed cookies together and helps create a firm, sliceable crust.
Cream cheese is the foundation of the cheesecake layer, giving it a smooth, rich texture and classic flavor.
Granulated sugar sweetens the cheesecake without overpowering the other elements.
Eggs provide structure and help the cheesecake set properly during baking.
Sour cream adds tanginess and creates a smoother, creamier texture.
Vanilla extract enhances the overall flavor and rounds out the sweetness.
All-purpose flour provides structure for the red velvet layer and helps stabilize the batter.
Unsweetened cocoa powder gives red velvet its subtle chocolate flavor.
Red food coloring creates the signature vibrant color associated with red velvet desserts.
Buttermilk adds moisture and tenderness to the red velvet layer while balancing sweetness.
Baking soda helps the red velvet layer rise slightly and remain soft.
Salt enhances all the flavors and balances the sweetness.
Directions
Preheat the oven to 175°C (350°F) and line the base of a springform pan with parchment paper. Crush the Oreo cookies into fine crumbs and mix with melted butter. Press the mixture firmly into the bottom of the pan and refrigerate while preparing the filling.
In a large bowl, beat the cream cheese until smooth. Add the sugar and mix until well combined. Beat in the eggs one at a time, followed by the sour cream and vanilla extract, mixing just until smooth.
In a separate bowl, whisk together the flour, cocoa powder, baking soda, and salt. In another bowl, combine the buttermilk and red food coloring. Gently fold the dry ingredients into the buttermilk mixture to form the red velvet batter.
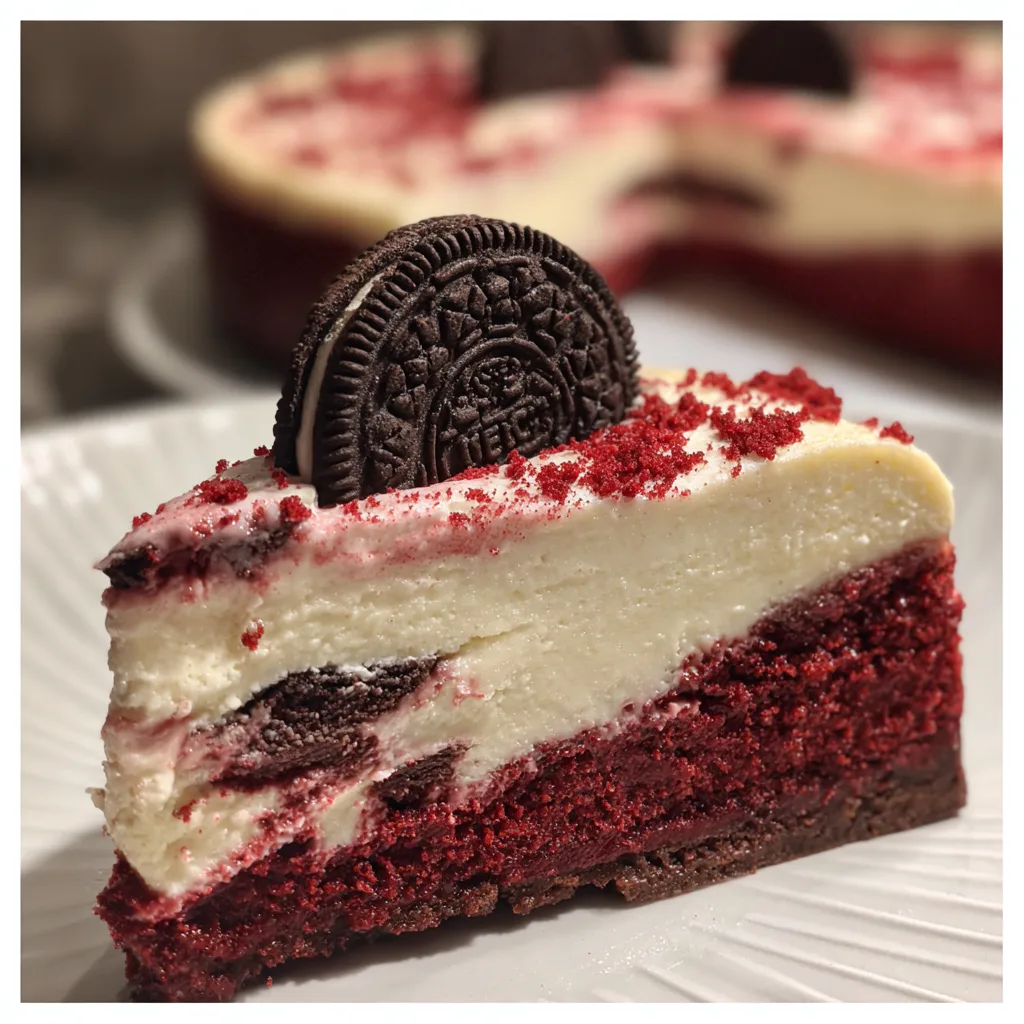
Pour half of the cheesecake filling over the chilled crust. Spoon the red velvet batter evenly over the cheesecake layer, then carefully spread the remaining cheesecake filling on top.
Bake for 55 to 65 minutes, until the center is just set with a slight wobble. Turn off the oven and let the cheesecake cool inside with the door slightly open for 30 minutes. Remove and cool completely, then refrigerate for at least 4 hours before slicing.
Servings and timing
This recipe serves 10 to 12 people.
Preparation time is approximately 30 minutes.
Baking time is 55 to 65 minutes.
Chilling time is at least 4 hours.
Equipment needed
Must-Have Tools to Get Rolling
Here’s what you’ll want to have on hand:
Silicone Spatula – Durable, heat-resistant silicone spatula perfect for mixing, scraping, and spreading. Gentle on non-stick cookware and easy to clean.
Large pot – You’ll need this to boil the whole cabbage head and soften the leaves.
large bowl –Spacious, durable large bowl ideal for mixing, serving, or food preparation. Made from sturdy material and easy to clean.
Sharp knife – For coring the cabbage and slicing out the thick stem in each leaf. A paring knife works best.
Mixing bowl – A big bowl makes it easier to combine your meat and rice filling evenly.
Cutting board – For prepping cabbage leaves and rolling them like a pro.
Full-Size Blender – is a powerful kitchen appliance for making smoothies, soups, and sauces in large batches.
3-in-1 Air Fryer – This versatile 3-in-1 air fryer offers Air Fry for healthier meals with less oil, Bake for bakery-quality desserts and treats, and Reheat to bring leftovers back to life with crispy, flavorful results
Variations and Customizations
This cheesecake is easy to adapt to different tastes. For extra Oreo flavor, chopped Oreo pieces can be folded into the cheesecake batter. A chocolate ganache topping can be added for an even more decadent finish.
If you prefer a milder sweetness, reduce the sugar slightly and rely on the cookies for balance. For a holiday twist, peppermint extract can be added in small amounts to the cheesecake layer.
You can also make this recipe as individual mini cheesecakes using a muffin pan, reducing the baking time accordingly. Gluten-free Oreo-style cookies can be used for the crust to make the dessert gluten-free with minimal adjustment.
Nutrition and Dietary Info
Approximate values per serving:
| Nutrient | Amount |
|---|---|
| Calories | 520 kcal |
| Protein | 7 g |
| Carbohydrates | 48 g |
| Fat | 34 g |
| Saturated Fat | 18 g |
| Fiber | 2 g |
| Sugar | 34 g |
| Sodium | 360 mg |
Expert Tips & Customizations
Smooth Cheesecake Texture
Ensure all ingredients are at room temperature before mixing.
Prevent Cracks
Avoid overmixing and allow gradual cooling in the oven.
Clean Slices
Use a warm knife and wipe between cuts for neat presentation.
Flavor Balance
Do not overdo the cocoa powder; red velvet should be subtle.
FAQs
Can this cheesecake be made ahead of time?
Yes, it is best made a day in advance and chilled overnight.
How should it be stored?
Store covered in the refrigerator for up to five days.
Can I freeze Red Velvet Oreo Cheesecake?
Yes, freeze tightly wrapped slices for up to two months.
Do I have to use food coloring?
No, but it will not have the classic red velvet appearance without it.
Can I use low-fat cream cheese?
Full-fat cream cheese is recommended for best texture and flavor.
Why is my cheesecake soft in the center?
A slight wobble is normal; it will firm up as it chills.
Conclusion
Red Velvet Oreo Cheesecake is a bold, elegant dessert that combines rich flavor with visual appeal. With its creamy texture, layered design, and balanced sweetness, it is perfect for celebrations or anytime you want a dessert that feels truly special. This is a recipe that delivers consistent results and leaves a lasting impression on anyone who tries it.
Hungry for more? Visit our website for full recipes and follow us on Pinterest for daily foodie inspo you’ll love to pin!