
Introduction
If you’re craving a quick dessert that feels indulgent yet incredibly easy to make, these banana dessert cups are the perfect solution. They’re creamy, naturally sweet, and layered with delicious textures that make every bite satisfying. Whether you’re preparing a last-minute treat or something special for guests, this recipe delivers big flavor with minimal effort.
I remember trying this with a splash of vanilla and a sprinkle of crushed biscuits, and it instantly turned into one of those desserts you can’t stop eating. The bananas add natural sweetness, while the creamy layers create a smooth and comforting texture.
Best of all, these dessert cups require no baking, making them ideal for warm days or when you want something quick and fuss-free. Simple ingredients, quick assembly, and a beautiful presentation make this a go-to dessert you’ll love making again and again.
Print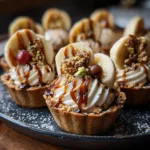
Banana Dessert Cups – Creamy, Sweet, and Irresistibly Easy Treat
- Total Time: 40 minutes
- Yield: 3 servings
- Diet: Vegetarian
Description
Creamy and delightful banana dessert cups layered with sweet bananas, whipped cream, and crunchy biscuits—an easy no-bake treat.
Ingredients
- 2 ripe bananas, sliced
- 1 cup whipped cream
- 1/2 cup vanilla yogurt
- 1/2 cup crushed biscuits or graham crackers
- 2 tablespoons honey or sugar
- 1/2 teaspoon vanilla extract
- 2 tablespoons chocolate chips or chocolate shavings
- 1 tablespoon chopped nuts (optional)
Instructions
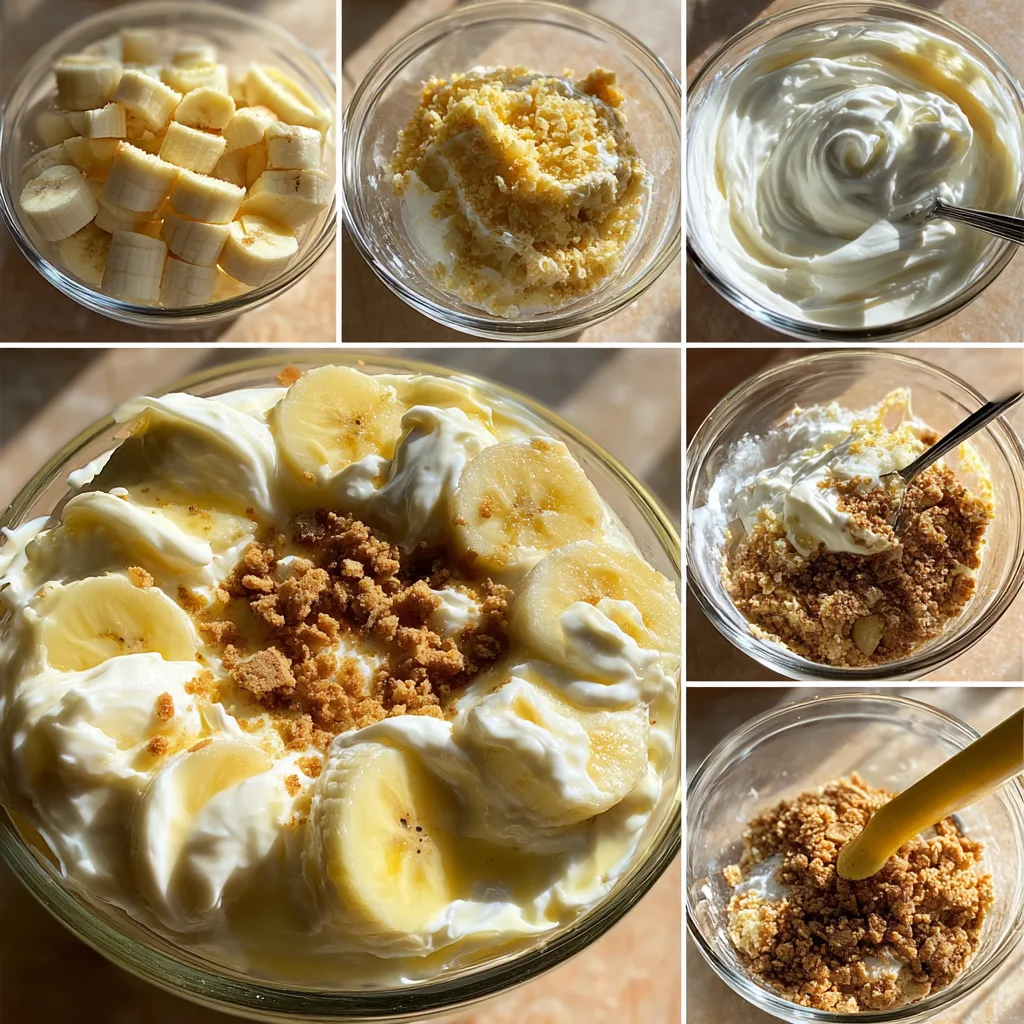
- In a bowl, mix whipped cream, yogurt, honey, and vanilla extract until smooth.
- Prepare serving cups or glasses.
- Add a layer of crushed biscuits at the bottom.
- Add a layer of banana slices.
- Spoon a layer of the cream mixture over the bananas.
- Repeat layers until cups are filled.
- Top with chocolate chips and chopped nuts.
- Chill in the refrigerator for at least 30 minutes before serving.
- Serve cold and enjoy.
Notes
- Use ripe bananas for natural sweetness.
- You can replace yogurt with cream cheese for a richer taste.
- Add caramel sauce for extra flavor.
- Best served chilled for a refreshing dessert.
- Prep Time: 10 minutes
- Cook Time: 0 minutes
- Category: Dessert
- Method: No-Bake
- Cuisine: International
Why You’ll Love This Recipe
This dessert is quick, no-bake, naturally sweet, and perfect for satisfying your sweet cravings with minimal effort.
Ingredients
(Tip: You can find the complete list of ingredients and their measurements in the recipe card below.)
Bananas
The main ingredient, bananas provide natural sweetness and a soft, creamy texture.
Whipped Cream
Adds a light, airy texture that makes the dessert feel indulgent yet balanced.
Milk
Helps create a smooth and creamy consistency when combined with other ingredients.
Vanilla Extract
Enhances the flavor with a warm, sweet aroma.
Sugar
Adds extra sweetness and balances the flavors.
Crushed Biscuits
Provide a crunchy layer that contrasts beautifully with the creamy elements.
Butter
Used to bind the biscuit base and add richness.
Chocolate Chips
Add bursts of chocolate flavor throughout the dessert.
Caramel Sauce
Brings a rich, sweet drizzle that elevates the overall taste.
Directions
Start by crushing the biscuits into fine crumbs and mixing them with melted butter until the texture resembles wet sand. This will form the base layer of your dessert cups.
Spoon the biscuit mixture into the bottom of each serving cup and press it down gently to create a firm base.
In a bowl, mash the bananas until smooth. Add milk, sugar, and vanilla extract, then mix well until you achieve a creamy consistency.
Fold in the whipped cream gently to keep the mixture light and airy.
Layer the banana cream mixture over the biscuit base in each cup. You can add another layer of biscuits if you prefer extra crunch.
Sprinkle chocolate chips over the top and drizzle with caramel sauce for a rich finishing touch.
Refrigerate the cups for at least 30 minutes before serving to allow the flavors to set and develop.
Serve chilled and enjoy the creamy, sweet layers.
Equipment needed : Must-Have Tools to Get Rolling
Here’s what you’ll want to have on hand:
Silicone Spatula – Durable, heat-resistant silicone spatula perfect for mixing, scraping, and spreading. Gentle on non-stick cookware and easy to clean.
Large pot – You’ll need this to boil the whole cabbage head and soften the leaves.
large bowl –Spacious, durable large bowl ideal for mixing, serving, or food preparation. Made from sturdy material and easy to clean.
Sharp knife – For coring the cabbage and slicing out the thick stem in each leaf. A paring knife works best.
Mixing bowl – A big bowl makes it easier to combine your meat and rice filling evenly.
Cutting board – For prepping cabbage leaves and rolling them like a pro.
Full-Size Blender – is a powerful kitchen appliance for making smoothies, soups, and sauces in large batches.
3-in-1 Air Fryer – This versatile 3-in-1 air fryer offers Air Fry for healthier meals with less oil, Bake for bakery-quality desserts and treats, and Reheat to bring leftovers back to life with crispy, flavorful results
Servings and timing
This recipe serves 4–6 people and takes approximately 15 minutes to prepare, plus 30 minutes chilling time.
Storage/reheating
Store the dessert cups in the refrigerator for up to 2 days. These are best served chilled and do not require reheating.
Variations and Customizations
These banana dessert cups are incredibly flexible, allowing you to customize them based on your preferences. You can swap whipped cream for Greek yogurt if you want a slightly tangy and lighter version. I’ve tried this, and it adds a refreshing twist while still keeping the dessert creamy.
For a richer version, consider adding a layer of chocolate ganache or using chocolate pudding instead of part of the cream mixture. This creates a more decadent dessert that chocolate lovers will adore.
You can also experiment with different toppings. Crushed nuts, shredded coconut, or even fresh berries add extra texture and flavor. I once added strawberries, and the combination of banana and berries was absolutely delicious.
If you want a healthier option, reduce the sugar and rely more on the natural sweetness of the bananas. You can also use whole-grain biscuits for added fiber.
For a fun presentation, layer the dessert in clear glasses so you can see the beautiful layers. This makes it perfect for parties or special occasions.
You can even turn this into a frozen treat by placing the cups in the freezer for a couple of hours, creating a semi-frozen dessert that’s perfect for hot days.
Nutrition and Dietary Info
| Nutrient | Amount per Serving |
|---|---|
| Calories | 320 kcal |
| Protein | 4 g |
| Carbs | 45 g |
| Fat | 14 g |
| Saturated Fat | 8 g |
| Fiber | 3 g |
| Sugar | 26 g |
| Sodium | 180 mg |
Expert Tips & Customizations
Use Ripe Bananas
Ripe bananas provide the best natural sweetness and flavor.
Chill Before Serving
Refrigerating helps the layers set and improves texture.
Don’t Overmix
Gently fold whipped cream to keep it light and airy.
Balance Sweetness
Adjust sugar depending on how ripe your bananas are.
Layer Creatively
Alternate textures for a more interesting dessert experience.
FAQs
Can I make this dessert ahead of time?
Yes, it can be prepared a few hours in advance and stored in the refrigerator.
Can I use store-bought whipped cream?
Yes, it works perfectly and saves time.
Can I make this dessert without sugar?
Yes, rely on ripe bananas or use a sugar substitute.
Can I freeze banana dessert cups?
Yes, for a semi-frozen treat, freeze for a couple of hours before serving.
What biscuits work best?
Digestive biscuits or graham crackers are great options.
How do I prevent bananas from browning?
Add a little lemon juice to the mashed bananas.
Conclusion
These banana dessert cups are the perfect combination of simplicity and indulgence. With their creamy layers, natural sweetness, and customizable options, they’re a dessert you can whip up anytime with confidence. Whether for a quick treat or a special occasion, this recipe delivers delicious results with minimal effort.
Hungry for more? Visit our website for full recipes and follow us on Pinterest for daily foodie inspo you’ll love to pin!