Introduction
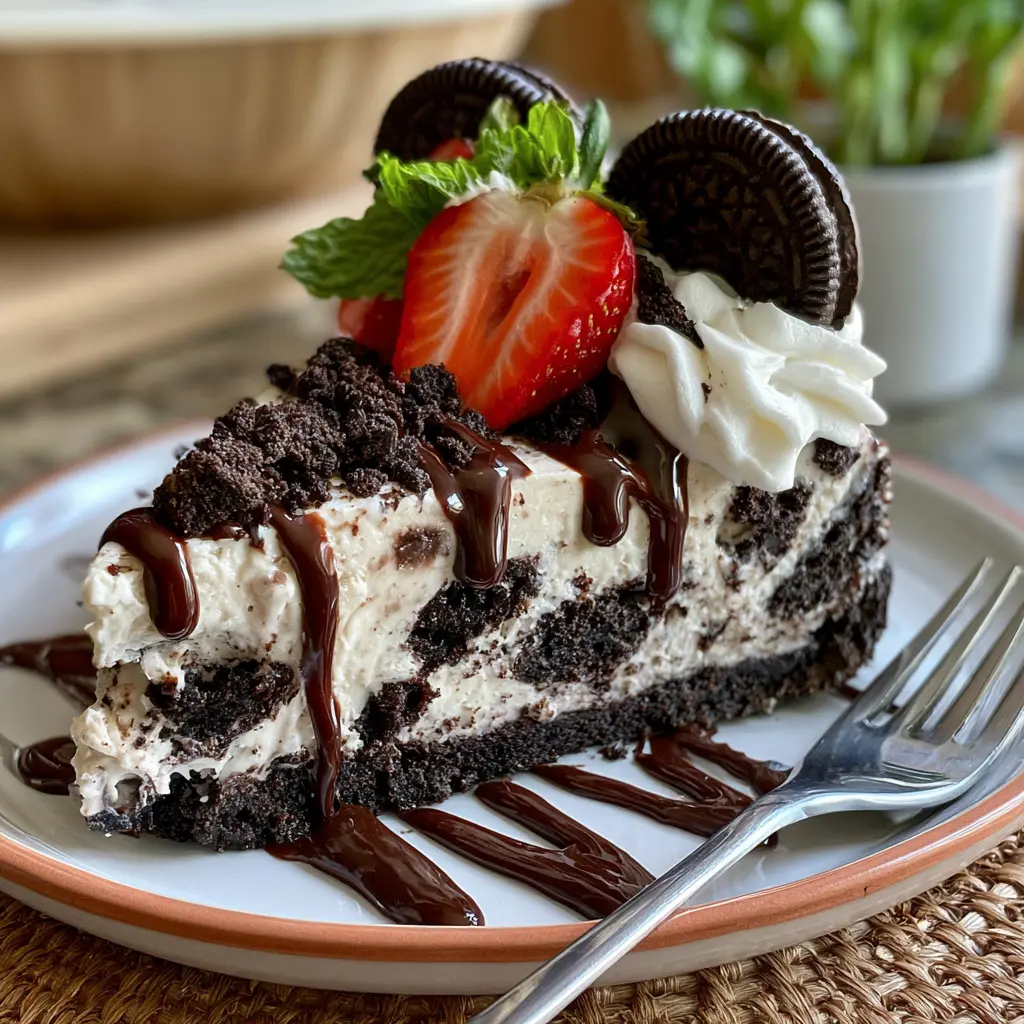
If you love rich, creamy desserts but do not want to turn on the oven, this No-Bake Oreo Cheesecake is the perfect recipe for you. It combines a buttery Oreo cookie crust with a smooth, velvety cream cheese filling packed with crushed Oreo cookies. Every bite delivers the perfect balance of chocolate cookie crunch and creamy cheesecake, making it a dessert that everyone will love.
I first made this cheesecake for a family gathering during the summer when baking was the last thing I wanted to do. It quickly became the star of the dessert table, and everyone asked for the recipe. Since then, I have made it for birthdays, holidays, and weekend treats, and it never disappoints. Whether you are a beginner or an experienced home baker, this foolproof recipe comes together with minimal effort and delivers bakery-quality results every single time.
Print
No-Bake Oreo Cheesecake – The Ultimate Creamy and Easy Dessert Recipe
- Total Time: 6 hours 25 minutes
- Yield: 12 servings
- Diet: Vegetarian
Description
No-Bake Oreo Cheesecake is a rich and creamy dessert featuring a buttery Oreo cookie crust, smooth cream cheese filling loaded with crushed Oreo cookies, and a fluffy whipped topping. This easy make-ahead dessert is perfect for holidays, birthdays, or anytime you crave cookies and cream.
Ingredients
- 30 Oreo cookies, divided
- 6 tablespoons unsalted butter, melted
- 16 oz cream cheese, softened
- 1 cup powdered sugar
- 1 teaspoon vanilla extract
- 1 1/2 cups heavy whipping cream, cold
- 1/2 cup sour cream
- 8 Oreo cookies, roughly chopped
- Whipped cream, for garnish (optional)
- Mini Oreo cookies, for garnish (optional)
- Chocolate shavings, for garnish (optional)
Instructions
- Crush 22 Oreo cookies into fine crumbs using a food processor.
- Mix the Oreo crumbs with the melted butter until evenly moistened.
- Press the mixture firmly into the bottom of a 9-inch springform pan.
- Refrigerate the crust for at least 20 minutes.
- Beat the softened cream cheese until smooth and creamy.
- Add the powdered sugar, vanilla extract, and sour cream, mixing until fully combined.
- In a separate bowl, whip the heavy cream to stiff peaks.
- Fold the whipped cream gently into the cream cheese mixture.
- Fold in the chopped Oreo cookies.
- Spread the filling evenly over the chilled crust.
- Crush the remaining Oreo cookies and sprinkle them over the top.
- Refrigerate for at least 6 hours, preferably overnight, until fully set.
- Garnish with whipped cream, mini Oreos, and chocolate shavings before serving.
Notes
- Use full-fat cream cheese for the creamiest texture.
- Chill overnight for the cleanest slices and best flavor.
- Freeze for 30 minutes before slicing for easier serving.
- Customize with chocolate ganache or caramel drizzle.
- Store covered in the refrigerator for up to 5 days or freeze for up to 2 months.
- Prep Time: 25 minutes
- Cook Time: 0 minutes
- Category: Dessert
- Method: No-Bake
- Cuisine: American
Why You’ll Love This Recipe
- No oven required.
- Rich, creamy, and perfectly smooth.
- Loaded with Oreo cookie flavor.
- Easy enough for beginners.
- Great for birthdays, holidays, and parties.
- Make-ahead friendly.
- Uses simple ingredients.
- Perfectly balanced sweetness.
- Easy to customize with different toppings.
- A guaranteed crowd-pleaser.
Ingredients
Tip: You can find the complete list of ingredients and their measurements in the recipe card below.
Oreo Cookies are the heart of this dessert. They create both the chocolate cookie crust and the delicious cookie pieces folded into the creamy filling. Their signature flavor gives this cheesecake its irresistible taste and texture.
Unsalted Butter binds the crushed Oreo crumbs together to form a sturdy crust. Melted butter also adds richness and helps the base hold its shape after chilling.
Cream Cheese is the foundation of the cheesecake filling. Use full-fat cream cheese that has softened to room temperature for the smoothest, creamiest consistency without lumps.
Powdered Sugar sweetens the filling while blending effortlessly into the cream cheese. Unlike granulated sugar, it dissolves easily, creating a silky texture.
Vanilla Extract enhances the overall flavor by adding a subtle warmth that complements both the chocolate cookies and the cream cheese.
Heavy Whipping Cream creates a light, fluffy texture when whipped before being folded into the filling. This ingredient helps the cheesecake set beautifully without baking.
Additional Crushed Oreo Cookies folded into the filling provide delicious cookie chunks in every bite, creating wonderful texture throughout the cheesecake.
Whipped Cream makes an elegant topping and adds extra creaminess to each slice.
Mini Oreo Cookies are optional but make an attractive decoration for serving and special occasions.
Chocolate Shavings or crushed Oreo crumbs sprinkled over the top give the finished cheesecake a beautiful bakery-style appearance.
Every ingredient contributes to a dessert that is rich, creamy, and incredibly satisfying while remaining surprisingly simple to prepare.
How to Make
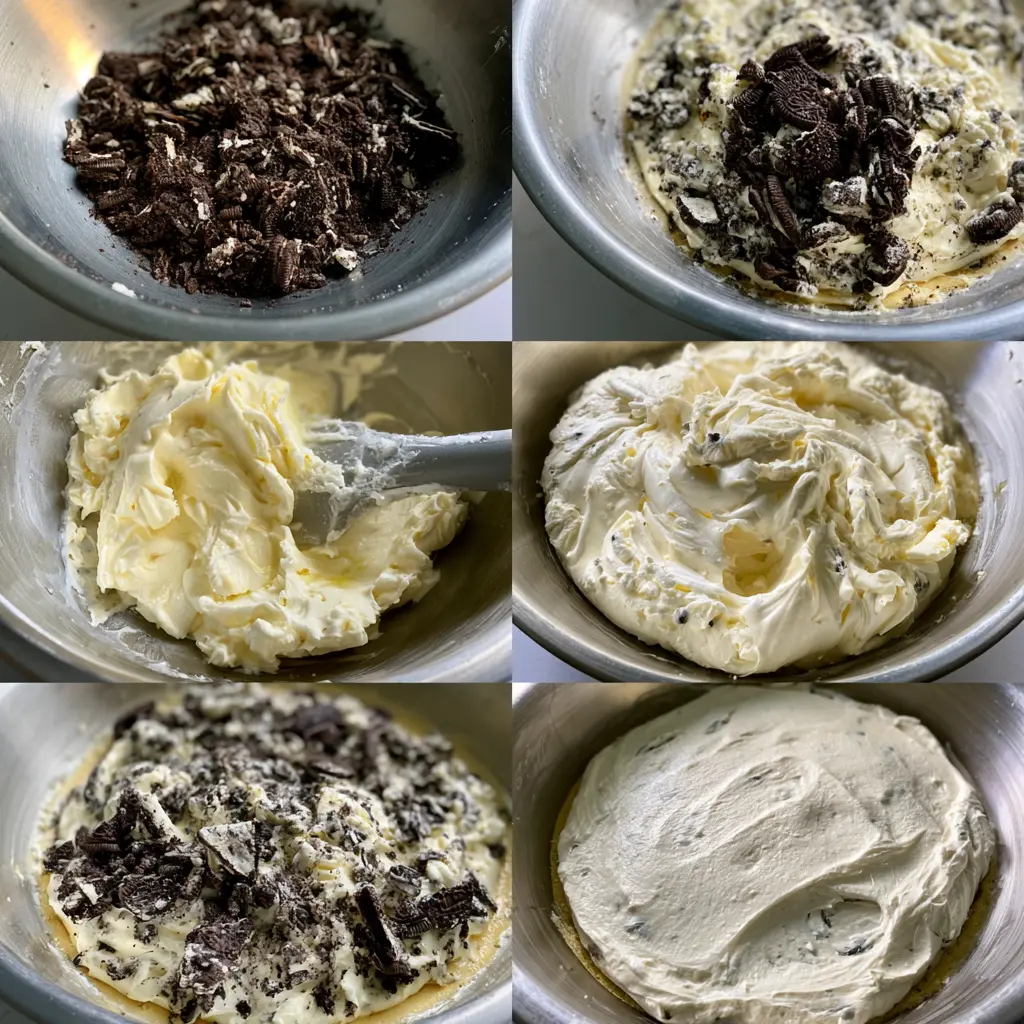
Begin by crushing the Oreo cookies into fine crumbs using a food processor or by placing them in a sealed bag and crushing them with a rolling pin. Mix the crumbs with melted butter until evenly coated.
Press the crumb mixture firmly into the bottom of a springform pan, creating an even crust. Refrigerate the crust for at least 20 minutes while preparing the filling.
In a large mixing bowl, beat the softened cream cheese until smooth and creamy. Add the powdered sugar and vanilla extract, then continue mixing until fully combined.
In a separate bowl, whip the heavy cream until stiff peaks form. Carefully fold the whipped cream into the cream cheese mixture using a spatula. This keeps the filling light and airy.
Gently fold the crushed Oreo cookies into the filling until evenly distributed. Avoid overmixing so the filling remains fluffy.
Spread the cheesecake filling evenly over the chilled crust, smoothing the top with a spatula. Cover the pan and refrigerate for at least 6 hours, although overnight chilling produces the best texture and flavor.
Once fully chilled, carefully remove the cheesecake from the pan. Decorate with whipped cream swirls, mini Oreo cookies, chocolate shavings, or additional crushed cookies before slicing.
Use a sharp knife dipped in warm water and wiped clean between cuts for neat, professional-looking slices. Serve chilled and enjoy every creamy, chocolate-filled bite.
Common Mistakes to Avoid
- Using cold cream cheese, which creates lumps.
- Not chilling the cheesecake long enough.
- Overmixing the whipped cream into the filling.
- Pressing the crust too loosely.
- Using low-fat cream cheese for the filling.
- Skipping the chilling time before slicing.
- Overloading the filling with too many cookie pieces.
Equipment Needed
Here’s what you’ll want to have on hand:
Silicone Spatula – Durable, heat-resistant silicone spatula perfect for mixing, scraping, and spreading. Gentle on non-stick cookware and easy to clean.
Large pot – You’ll need this to boil the whole cabbage head and soften the leaves.
large bowl –Spacious, durable large bowl ideal for mixing, serving, or food preparation. Made from sturdy material and easy to clean.
Sharp knife – For coring the cabbage and slicing out the thick stem in each leaf. A paring knife works best.
Mixing bowl – A big bowl makes it easier to combine your meat and rice filling evenly.
Cutting board – For prepping cabbage leaves and rolling them like a pro.
Full-Size Blender – is a powerful kitchen appliance for making smoothies, soups, and sauces in large batches.
3-in-1 Air Fryer – This versatile 3-in-1 air fryer offers Air Fry for healthier meals with less oil, Bake for bakery-quality desserts and treats, and Reheat to bring leftovers back to life with crispy, flavorful results
Servings and Timing
- Servings: 10
- Prep Time: 25 minutes
- Chill Time: 6 hours
- Total Time: 6 hours 25 minutes
Storage/Reheating
Store the cheesecake covered in the refrigerator for up to five days. For longer storage, freeze individual slices in airtight containers for up to two months. Thaw overnight in the refrigerator before serving. This dessert is not suitable for reheating because it is designed to be enjoyed chilled.
Variations and Customizations
This No-Bake Oreo Cheesecake is incredibly versatile, making it easy to create new flavors for every occasion. Add melted dark chocolate to the filling for an even richer chocolate cheesecake, or stir in white chocolate for a sweeter, creamier variation.
For a peanut butter version, blend creamy peanut butter into the filling before folding in the crushed cookies. The combination of peanut butter and Oreos creates an indulgent dessert that is hard to resist.
Coffee lovers can add a teaspoon of espresso powder to enhance the chocolate flavor while giving the cheesecake a subtle mocha twist. During the holidays, mix in a pinch of peppermint extract and garnish with crushed peppermint candies for a festive dessert.
Fresh fruit also pairs wonderfully with this cheesecake. Top slices with strawberries, raspberries, or blueberries to balance the richness with a refreshing burst of flavor.
For a caramel-inspired dessert, drizzle salted caramel sauce over each slice just before serving. Chopped toasted pecans or walnuts add extra crunch and a delicious nutty flavor.
You can even prepare this recipe in individual dessert glasses or jars for elegant single servings at parties. Layer the Oreo crumbs and cheesecake filling for a beautiful presentation.
Experiment with different Oreo flavors such as Golden Oreos, Mint Oreos, or Birthday Cake Oreos to create exciting variations that suit every taste and celebration.
Nutrition and Dietary Info
| Nutrient | Per Serving |
|---|---|
| Calories | 520 |
| Protein | 6 g |
| Carbohydrates | 42 g |
| Fat | 37 g |
| Saturated Fat | 22 g |
| Fiber | 2 g |
| Sugar | 30 g |
| Sodium | 360 mg |
Nutrition values are approximate and may vary depending on the ingredients used.
Expert Tips & Customizations
Soften the Cream Cheese: Room-temperature cream cheese creates the smoothest filling.
Whip the Cream Properly: Stiff peaks provide a light, stable cheesecake texture.
Use Full-Fat Ingredients: They produce the richest flavor and best consistency.
Chill Overnight: Extra chilling time improves both texture and flavor.
Crush Cookies Evenly: Fine crumbs create a sturdy crust that slices neatly.
Decorate Before Serving: Fresh whipped cream and Oreo cookies look their best just before serving.
Slice Like a Pro: Dip your knife in warm water and wipe it clean after every cut.
Customize the Toppings: Try chocolate sauce, caramel drizzle, fresh berries, or cookie crumbs for different presentations.
FAQs
Can I make this cheesecake ahead of time?
Yes. It is an excellent make-ahead dessert and tastes even better after chilling overnight.
Can I freeze No-Bake Oreo Cheesecake?
Yes. Freeze it for up to two months in an airtight container and thaw in the refrigerator.
Do I need a springform pan?
A springform pan is recommended because it makes removing the cheesecake much easier.
Can I use low-fat cream cheese?
You can, but full-fat cream cheese provides a richer flavor and firmer texture.
How long does it need to chill?
At least six hours, although overnight chilling is ideal.
Can I use different Oreo flavors?
Absolutely. Golden, Mint, Peanut Butter, or Birthday Cake Oreos all make delicious variations.
Conclusion
This No-Bake Oreo Cheesecake is everything a great dessert should be—rich, creamy, easy to prepare, and filled with classic Oreo flavor. With its buttery cookie crust, fluffy cheesecake filling, and endless customization options, it is perfect for birthdays, holidays, family gatherings, or simply satisfying a sweet craving. Once you make this effortless no-bake dessert, it is sure to become one of your favorite recipes to share with family and friends.
Hungry for more? Visit our website for full recipes and follow us on Pinterest for daily foodie inspo you’ll love to pin!