
Introduction
Chocolate and peanut butter is one of those timeless flavor combinations that never disappoints. These Chocolate Peanut Butter Dream Bars are rich, creamy, and perfectly balanced between sweet and salty. The first time I made these, I was looking for a simple dessert that did not require turning on the oven, and they exceeded every expectation. The texture is wonderfully layered: a buttery cookie base, a smooth peanut butter center, and a glossy chocolate topping that sets beautifully. I have even experimented with using crunchy peanut butter for added texture, and it worked beautifully. These bars are ideal for gatherings, holiday trays, or simply when you need a satisfying homemade treat. They slice neatly, store well, and taste even better the next day after the layers have fully set. If you enjoy indulgent desserts that are easy to prepare yet impressive to serve, this recipe will quickly become a favorite in your kitchen.
Print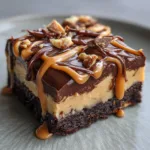
Chocolate Peanut Butter Dream Bars – A Decadent No-Bake Treat Everyone Loves
- Total Time: 2 hours 20 minutes
- Yield: 24 bars
- Diet: Vegetarian
Description
Chocolate Peanut Butter Dream Bars are rich, no-bake dessert bars featuring a buttery peanut butter graham cracker base topped with a smooth, creamy chocolate layer. These indulgent treats are easy to make and perfect for parties, holidays, or anytime cravings.
Ingredients
- 1 cup unsalted butter, melted
- 2 cups graham cracker crumbs
- 1 1/2 cups creamy peanut butter, divided
- 2 cups powdered sugar
- 1 1/2 cups semi-sweet chocolate chips
- 1/4 teaspoon salt
Instructions
- Line a 9×13-inch baking pan with parchment paper.
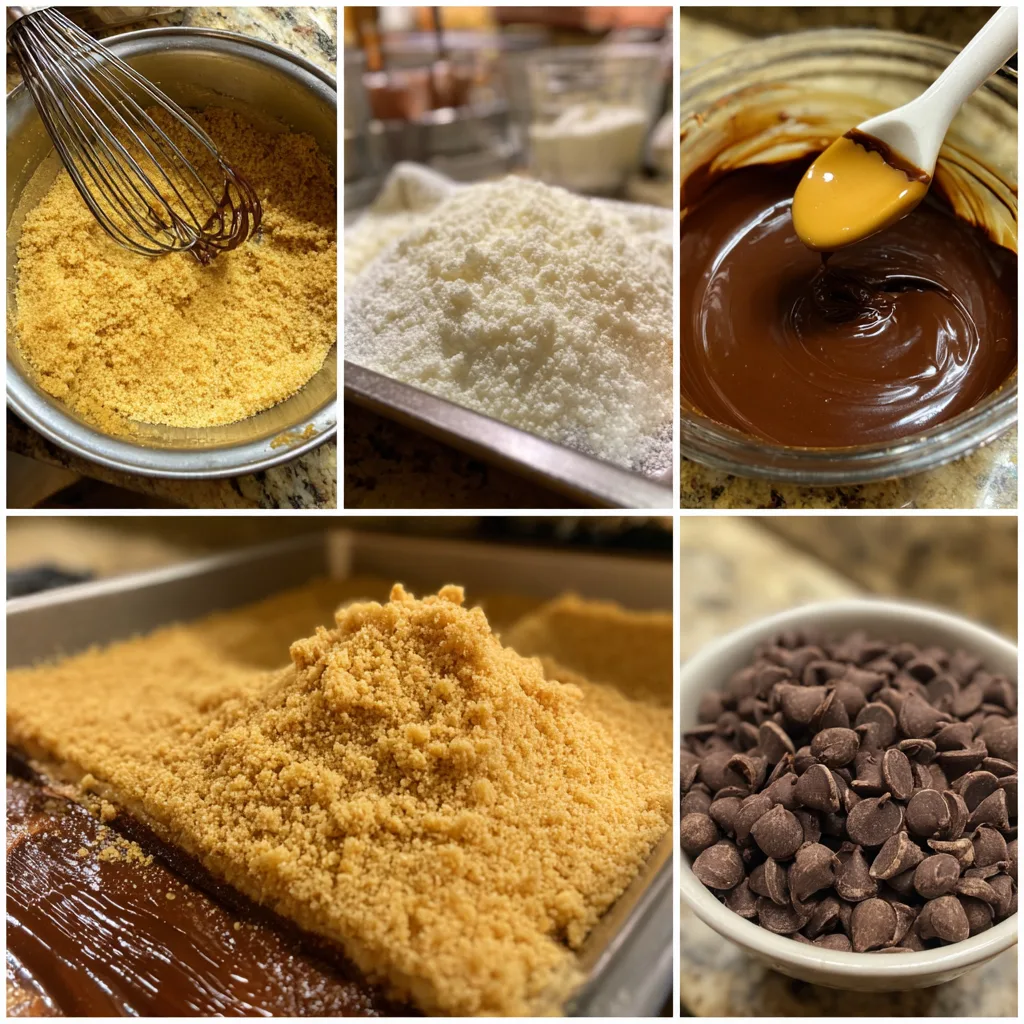
- In a large bowl, mix melted butter, graham cracker crumbs, 1 cup peanut butter, powdered sugar, and salt until fully combined.
- Press the mixture evenly into the prepared pan to form the base layer.
- In a microwave-safe bowl, melt chocolate chips with the remaining 1/2 cup peanut butter in 30-second intervals, stirring until smooth.
- Pour the chocolate mixture over the peanut butter base and spread evenly.
- Refrigerate for at least 2 hours, or until fully set.
- Cut into bars and serve chilled or at room temperature.
Notes
- Store bars in an airtight container in the refrigerator for up to 1 week.
- For cleaner cuts, use a sharp knife wiped clean between slices.
- Crunchy peanut butter can be substituted for added texture.
- Bars can be frozen for up to 2 months.
- Prep Time: 15 minutes
- Cook Time: 5 minutes
- Category: Dessert
- Method: No-Bake
- Cuisine: American
Why You’ll Love This Recipe
These bars require no baking, making them convenient and beginner-friendly. The ingredients are simple pantry staples, yet the final result tastes luxurious and bakery-quality. They are easy to customize, store beautifully, and can be made ahead of time for entertaining. The layered presentation also makes them visually appealing when sliced and served.
Ingredients
(Tip: You can find the complete list of ingredients and their measurements in the recipe card below.)
Ingredients Breakdown
Graham cracker crumbs
These form the base of the bars, providing structure and a subtle honeyed flavor. Finely crushed crumbs work best to create a compact and sturdy crust.
Unsalted butter
Melted butter binds the crust together and adds richness. Using unsalted butter allows you to better control the overall saltiness of the dessert.
Creamy peanut butter
The star ingredient of the filling. Smooth peanut butter creates a silky texture, though I have tried natural peanut butter and found it works well if stirred thoroughly before using.
Powdered sugar
This sweetens the peanut butter layer while keeping it smooth and free of graininess. It blends seamlessly into the mixture.
Vanilla extract
A small amount enhances the overall flavor, adding warmth and depth to the peanut butter layer.
Semi-sweet chocolate chips
These melt into a rich, balanced chocolate topping that is not overly sweet. Semi-sweet chocolate complements the peanut butter perfectly.
Heavy cream
Used to create a smooth chocolate ganache topping, ensuring the top layer slices cleanly without cracking.
Directions
Start by preparing an 8×8-inch baking pan and lining it with parchment paper, leaving some overhang for easy removal later. In a medium bowl, combine the graham cracker crumbs with melted butter and mix until evenly coated. Press this mixture firmly into the bottom of the prepared pan to form an even crust. Place it in the refrigerator to chill for about 20 minutes.
In another bowl, mix the peanut butter, powdered sugar, and vanilla extract until smooth and fully combined. Spread this peanut butter mixture evenly over the chilled crust, smoothing the top with a spatula. Return the pan to the refrigerator while you prepare the chocolate topping.
In a heatproof bowl, combine the chocolate chips and heavy cream. Melt gently using a microwave in short intervals, stirring between each, until smooth and glossy. Pour the melted chocolate over the peanut butter layer and spread evenly.
Refrigerate the bars for at least 2 hours, or until fully set. Once firm, lift the bars out using the parchment overhang and slice into squares using a sharp knife.
Equipment needed : Must-Have Tools to Get Rolling
Here’s what you’ll want to have on hand:
Silicone Spatula – Durable, heat-resistant silicone spatula perfect for mixing, scraping, and spreading. Gentle on non-stick cookware and easy to clean.
Large pot – You’ll need this to boil the whole cabbage head and soften the leaves.
large bowl –Spacious, durable large bowl ideal for mixing, serving, or food preparation. Made from sturdy material and easy to clean.
Sharp knife – For coring the cabbage and slicing out the thick stem in each leaf. A paring knife works best.
Mixing bowl – A big bowl makes it easier to combine your meat and rice filling evenly.
Cutting board – For prepping cabbage leaves and rolling them like a pro.
Full-Size Blender – is a powerful kitchen appliance for making smoothies, soups, and sauces in large batches.
3-in-1 Air Fryer – This versatile 3-in-1 air fryer offers Air Fry for healthier meals with less oil, Bake for bakery-quality desserts and treats, and Reheat to bring leftovers back to life with crispy, flavorful results
Servings and timing
This recipe makes approximately 16 bars.
Preparation time: 20 minutes
Chilling time: 2 hours
Total time: 2 hours 20 minutes
Storage/reheating
Store the bars in an airtight container in the refrigerator for up to 5 days. For longer storage, freeze them in a sealed container for up to 2 months. Allow frozen bars to thaw in the refrigerator before serving. These bars are best enjoyed chilled and do not require reheating.
Variations and Customizations
One of the best things about Chocolate Peanut Butter Dream Bars is how adaptable they are. If you enjoy texture, consider using crunchy peanut butter instead of creamy. The added peanut pieces create a pleasant contrast against the smooth chocolate topping.
For a slightly less sweet version, substitute dark chocolate chips for the semi-sweet variety. Dark chocolate provides a deeper cocoa flavor that balances the sweetness of the peanut butter layer beautifully. I have also experimented with adding a small pinch of sea salt on top before the chocolate sets, which enhances the overall flavor and adds a gourmet touch.
If you need a gluten-free option, use gluten-free graham cracker crumbs or crushed gluten-free cookies for the crust. The results are just as delicious and structurally sound.
For a richer twist, you can mix a few tablespoons of softened cream cheese into the peanut butter layer. This creates a cheesecake-like filling that feels even more indulgent.
If you prefer individual servings, press the layers into lined muffin tins instead of a square pan. This makes portion control easier and presentation more elegant for parties or special occasions.
Nutrition and Dietary Info
Approximate nutrition per serving (1 bar, based on 16 servings):
| Nutrient | Amount per Serving |
|---|---|
| Calories | 320 kcal |
| Protein | 6 g |
| Carbohydrates | 28 g |
| Fat | 22 g |
| Saturated Fat | 9 g |
| Fiber | 2 g |
| Sugar | 20 g |
| Sodium | 140 mg |
Values are estimates and may vary depending on specific brands used.
Expert Tips & Customizations
Perfectly Pressed Crust
Press the crust firmly using the bottom of a measuring cup to ensure clean slices later.
Smooth Chocolate Finish
Allow the melted chocolate to cool slightly before pouring to prevent melting the peanut butter layer.
Clean Cutting Technique
Use a sharp knife warmed under hot water and wiped dry between cuts for neat edges.
Balanced Sweetness
Add a small pinch of salt to the peanut butter mixture if using unsalted peanut butter to enhance flavor depth.
FAQs
Can I use natural peanut butter?
Yes, but make sure it is well stirred and not overly oily, as separation can affect the texture of the filling.
Can I freeze these bars?
Yes, they freeze very well for up to two months when stored in an airtight container.
Why is my chocolate layer cracking?
If the chocolate is too thick or chilled too quickly, it may crack; adding heavy cream helps maintain a softer ganache texture.
Can I make this recipe dairy-free?
Yes, substitute dairy-free butter and coconut cream for the heavy cream, and use dairy-free chocolate chips.
How do I make the bars less sweet?
Use dark chocolate instead of semi-sweet and slightly reduce the powdered sugar in the filling.
Can I double the recipe?
Yes, double the ingredients and use a 9×13-inch pan, adjusting chilling time slightly if needed.
Conclusion
Chocolate Peanut Butter Dream Bars are a simple yet indulgent dessert that delivers maximum flavor with minimal effort. The no-bake preparation makes them accessible to bakers of all skill levels, while the rich layered texture ensures they taste truly special. Whether prepared for a celebration or a quiet evening treat, these bars offer a reliable and satisfying dessert option that will quickly become a staple in your recipe collection.
Hungry for more? Visit our website for full recipes and follow us on Pinterest for daily foodie inspo you’ll love to pin!