Why You’ll Love This Recipe
If you are looking for a quick, creamy, and absolutely irresistible dessert, these No-Bake Honey Cream Cheese Cups are exactly what you need. With just three simple ingredients, this recipe proves that delicious treats do not have to be complicated. I remember the first time I made these on a busy afternoon—I was surprised by how something so effortless could taste so rich and satisfying.
The smooth cream cheese pairs beautifully with the natural sweetness of honey, creating a silky texture that melts in your mouth. There is no baking required, no long prep time, and no special skills needed. Whether you are hosting guests, craving a late-night treat, or simply want a fuss-free dessert, these cups deliver every time. You can even prepare them ahead and store them in the fridge, making them perfect for entertaining or meal prep. Simple, elegant, and incredibly tasty—this is a dessert you will keep coming back to.
Print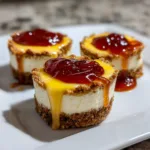
No-Bake Honey Cream Cheese Cups – The Easiest Creamy Dessert You’ll Ever Make
- Total Time: 40 minutes
- Yield: 3 servings
- Diet: Vegetarian
Description
A super simple no-bake dessert made with just three ingredients—creamy, sweet honey cream cheese layered into easy-to-make cups.
Ingredients
- 1 cup cream cheese, softened
- 1/3 cup honey
- 1 cup crushed biscuits or graham crackers
Instructions
- In a bowl, mix softened cream cheese and honey until smooth and creamy.
- Prepare serving cups or small glasses.
- Add a layer of crushed biscuits at the bottom.
- Spoon a layer of the honey cream cheese mixture over the biscuits.
- Repeat layers if desired.
- Chill in the refrigerator for at least 30 minutes before serving.
- Serve cold and enjoy.
Notes
- Use full-fat cream cheese for a richer texture.
- Add fresh fruits like berries or banana slices for variation.
- You can drizzle extra honey on top before serving.
- Chill longer for a firmer texture.
- Prep Time: 10 minutes
- Cook Time: 0 minutes
- Category: Dessert
- Method: No-Bake
- Cuisine: International
Ingredients
(Tip: You can find the complete list of ingredients and their measurements in the recipe card below.)
Cream cheese brings the rich, smooth, and slightly tangy base to this dessert, creating that signature creamy texture everyone loves. Make sure it is softened to room temperature for easy mixing.
Honey adds natural sweetness and a delicate floral flavor that perfectly balances the richness of the cream cheese. I tried this with raw honey, and it gave a deeper, more complex taste.
Whipped topping (or whipped cream) gives the dessert a light, airy finish, making each bite feel fluffy rather than heavy. It helps transform the mixture into a mousse-like consistency that is incredibly satisfying.
Directions
Start by placing your softened cream cheese into a mixing bowl. Using a hand mixer or a whisk, beat it until completely smooth and free of lumps. This step is essential to achieve that silky texture.
Next, slowly drizzle in the honey while continuing to mix. This ensures the sweetness is evenly distributed throughout the mixture. You will notice the texture becoming softer and more spreadable.
Gently fold in the whipped topping. Do not overmix here—use a spatula and fold carefully to maintain the airy consistency. The mixture should become light, fluffy, and slightly voluminous.
Once everything is well combined, spoon the mixture into small serving cups or dessert glasses. Smooth the tops for a clean presentation.
Place the cups in the refrigerator for at least one hour. This allows the dessert to set properly and enhances the flavors.
Before serving, you can add a drizzle of honey on top or a light garnish if desired. Serve chilled and enjoy the creamy, no-bake goodness.

Equipment needed : Must-Have Tools to Get Rolling
Here’s what you’ll want to have on hand:
Silicone Spatula – Durable, heat-resistant silicone spatula perfect for mixing, scraping, and spreading. Gentle on non-stick cookware and easy to clean.
Large pot – You’ll need this to boil the whole cabbage head and soften the leaves.
large bowl –Spacious, durable large bowl ideal for mixing, serving, or food preparation. Made from sturdy material and easy to clean.
Sharp knife – For coring the cabbage and slicing out the thick stem in each leaf. A paring knife works best.
Mixing bowl – A big bowl makes it easier to combine your meat and rice filling evenly.
Cutting board – For prepping cabbage leaves and rolling them like a pro.
Full-Size Blender – is a powerful kitchen appliance for making smoothies, soups, and sauces in large batches.
3-in-1 Air Fryer – This versatile 3-in-1 air fryer offers Air Fry for healthier meals with less oil, Bake for bakery-quality desserts and treats, and Reheat to bring leftovers back to life with crispy, flavorful results
Servings and timing
This recipe makes approximately 4 servings, with a preparation time of 10 minutes and a chilling time of 1 hour, making it a quick and convenient dessert option.
Storage/reheating
These honey cream cheese cups should be stored in the refrigerator in an airtight container or covered cups. They will stay fresh for up to 3 days. Since this is a no-bake dessert, reheating is not required. Simply serve chilled straight from the fridge. If the texture firms up too much, let it sit at room temperature for a few minutes before serving.
Variations and Customizations
One of the best things about this recipe is how easy it is to customize. You can switch the honey with maple syrup for a slightly different sweetness profile, which adds a warm, caramel-like note.
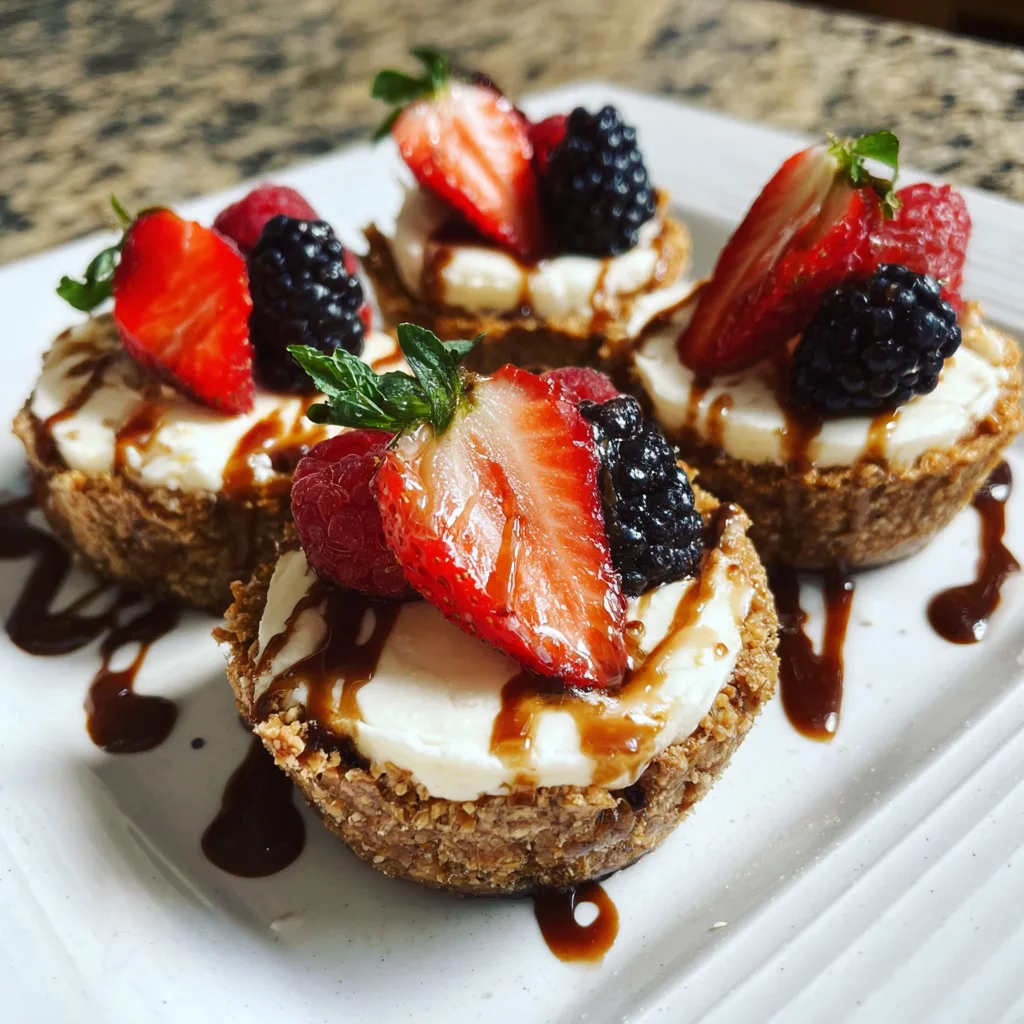
For a fruity twist, layer the cream mixture with fresh berries such as strawberries, blueberries, or raspberries. The tartness of the fruit balances the creamy sweetness beautifully.
If you want a bit of crunch, add crushed graham crackers or biscuit crumbs at the bottom of each cup. This creates a simple no-bake cheesecake-style dessert that feels more indulgent.
You can also experiment with flavor extracts. A drop of vanilla extract enhances the overall flavor, while a touch of lemon zest adds brightness and freshness.
For a lighter version, use low-fat cream cheese and light whipped topping. I tried this variation once, and it still turned out delicious while feeling less heavy.
Chocolate lovers can drizzle melted chocolate on top or fold in mini chocolate chips for a richer dessert.
This recipe is incredibly forgiving, so feel free to get creative and adapt it to your taste preferences or whatever ingredients you have at home.
Nutrition and Dietary Info
| Nutrient | Per Serving |
|---|---|
| Calories | 220 kcal |
| Protein (g) | 3 g |
| Carbs (g) | 18 g |
| Fat (g) | 15 g |
| Saturated Fat (g) | 9 g |
| Fiber (g) | 0 g |
| Sugar (g) | 16 g |
| Sodium (mg) | 140 mg |
This dessert is vegetarian-friendly and can be adjusted to suit lower-fat diets with simple ingredient swaps.
Expert Tips & Customizations
Use room temperature cream cheese
This ensures a smooth, lump-free texture that blends effortlessly.
Do not overmix after adding whipped topping
Overmixing can deflate the airy texture and make the dessert dense.
Chill for best flavor
Allowing the cups to chill enhances both texture and taste.
Adjust sweetness to preference
Taste before chilling and add more honey if you prefer it sweeter.
Serve in small portions
These are rich, so smaller servings make them more enjoyable.
FAQs
Can I use Greek yogurt instead of whipped topping?
Yes, but it will create a tangier and slightly denser texture compared to the light, airy version.
Can I make this dessert ahead of time?
Absolutely, it is perfect for making a day in advance and storing in the fridge.
Is it possible to freeze these cups?
Freezing is not recommended as it can alter the creamy texture once thawed.
What type of honey works best?
Any honey works well, but raw or organic honey provides a richer flavor.
Can I add toppings?
Yes, fresh fruits, nuts, or a drizzle of chocolate all work beautifully.
How do I make it less sweet?
Reduce the amount of honey or use a less sweet alternative like plain whipped cream.
Conclusion
These No-Bake Honey Cream Cheese Cups are the definition of simple luxury. With minimal ingredients and effort, you get a creamy, sweet, and satisfying dessert that feels far more indulgent than it actually is. Whether you are preparing a quick treat for yourself or an elegant dessert for guests, this recipe delivers every time. Once you try it, it is bound to become one of your go-to favorites for effortless desserts.
Hungry for more? Visit our website for full recipes and follow us on Pinterest for daily foodie inspo you’ll love to pin!