Why You’ll Love This Recipe
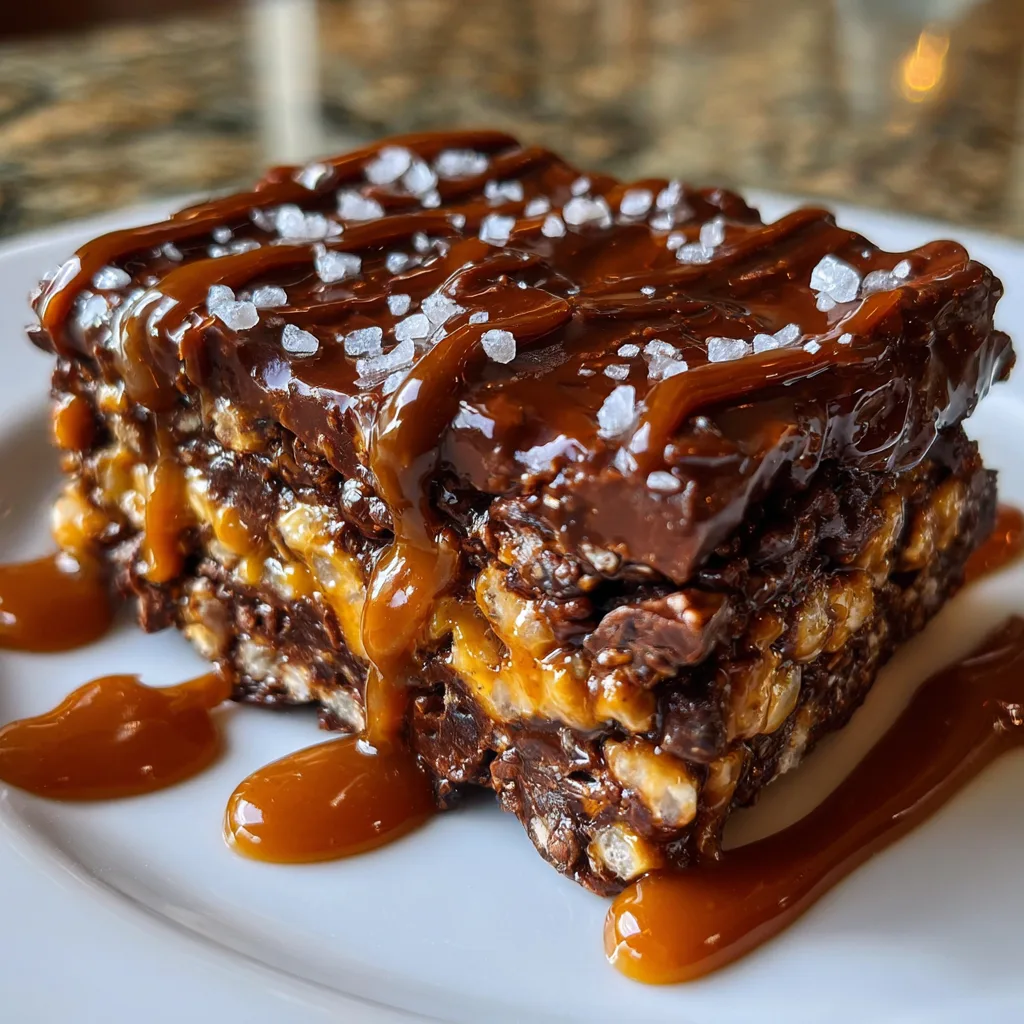
If you love desserts that are both incredibly easy and deeply satisfying, these No-Bake Chocolate Crunch Bars are about to become your new favorite. With just four simple ingredients, this recipe delivers a perfect balance of rich chocolate and crispy texture in every bite. I remember making these on a lazy weekend when I wanted something sweet without turning on the oven—and they turned out better than expected.
What makes these bars so special is their delightful crunch combined with a smooth chocolate coating that melts in your mouth. They are quick to prepare, require minimal cleanup, and are perfect for both kids and adults. Whether you need a last-minute dessert, a snack for gatherings, or a treat to keep in the fridge, these bars check all the boxes. Plus, they are highly customizable, so you can easily make them your own.
Print
No-Bake Chocolate Crunch Bars – Irresistibly Crispy, Rich, and Effortless Treat
- Total Time: 1 hour 10 minutes
- Yield: 8 bars
- Diet: Vegetarian
Description
Quick and delicious no-bake chocolate crunch bars made with just four ingredients, combining rich chocolate with a satisfying crispy texture.
Ingredients
- 2 cups chocolate chips
- 1 cup peanut butter
- 3 cups crispy rice cereal
- 2 tablespoons honey or maple syrup
Instructions
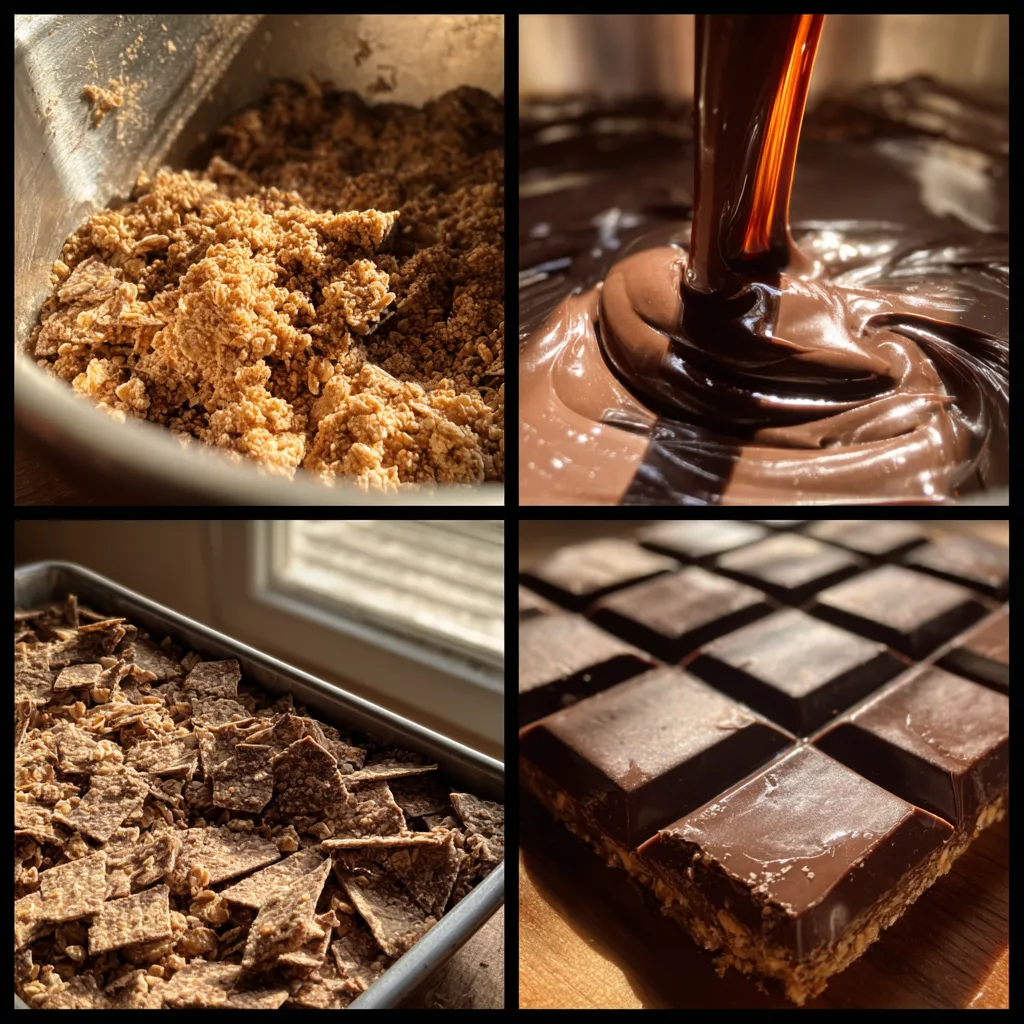
- In a microwave-safe bowl, melt the chocolate chips and peanut butter together in 30-second intervals, stirring until smooth.
- Stir in honey or maple syrup until fully combined.
- Add crispy rice cereal and gently fold until evenly coated.
- Transfer the mixture into a lined baking dish and press down evenly.
- Refrigerate for at least 1 hour until set.
- Cut into bars and serve.
Notes
- Use dark or milk chocolate depending on preference.
- Substitute peanut butter with almond or sunflower butter if needed.
- Store in the refrigerator for best texture.
- Add nuts or dried fruits for extra flavor.
- Prep Time: 10 minutes
- Cook Time: 0 minutes
- Category: Dessert
- Method: No-Bake
- Cuisine: International
Ingredients
(Tip: You can find the complete list of ingredients and their measurements in the recipe card below.)
Chocolate provides the rich, indulgent base of this recipe, giving the bars their deep flavor and smooth finish. I personally like using semi-sweet chocolate because it balances sweetness perfectly.
Crispy rice cereal is what creates that signature crunch. It adds a light, airy texture that contrasts beautifully with the melted chocolate.
Peanut butter brings a creamy, nutty richness that enhances both flavor and texture. It also helps bind everything together for perfectly set bars.
Honey acts as a natural sweetener and adds a subtle depth of flavor while helping the mixture hold its shape once chilled.
Directions
Start by melting the chocolate in a heatproof bowl using either a microwave in short intervals or a double boiler. Stir until smooth and fully melted to avoid any lumps or burning.
Once melted, add the peanut butter to the warm chocolate. Stir until the mixture becomes glossy and fully combined. The warmth of the chocolate will help the peanut butter blend easily.
Next, pour in the honey and mix well. This step adds sweetness and helps create a cohesive mixture that will set nicely.
Gently fold in the crispy rice cereal using a spatula. Be careful not to crush the cereal—fold slowly to maintain that crunchy texture.
Line a baking dish with parchment paper and transfer the mixture into it. Press it down evenly using the back of a spoon or spatula to create a smooth, compact layer.
Place the dish in the refrigerator for at least 1 to 2 hours, or until fully set.
Once firm, remove from the dish and cut into bars or squares. Serve chilled or at room temperature for a deliciously crunchy treat.
Equipment needed : Must-Have Tools to Get Rolling
Here’s what you’ll want to have on hand:
Silicone Spatula – Durable, heat-resistant silicone spatula perfect for mixing, scraping, and spreading. Gentle on non-stick cookware and easy to clean.
Large pot – You’ll need this to boil the whole cabbage head and soften the leaves.
large bowl –Spacious, durable large bowl ideal for mixing, serving, or food preparation. Made from sturdy material and easy to clean.
Sharp knife – For coring the cabbage and slicing out the thick stem in each leaf. A paring knife works best.
Mixing bowl – A big bowl makes it easier to combine your meat and rice filling evenly.
Cutting board – For prepping cabbage leaves and rolling them like a pro.
Full-Size Blender – is a powerful kitchen appliance for making smoothies, soups, and sauces in large batches.
3-in-1 Air Fryer – This versatile 3-in-1 air fryer offers Air Fry for healthier meals with less oil, Bake for bakery-quality desserts and treats, and Reheat to bring leftovers back to life with crispy, flavorful results
Servings and timing
This recipe makes about 12 bars, with a preparation time of 15 minutes and a chilling time of 1–2 hours, making it ideal for quick dessert preparation.
Storage/reheating
Store the chocolate crunch bars in an airtight container in the refrigerator for up to 5 days. They can also be kept at room temperature for a few hours when serving. If you prefer a firmer texture, keep them chilled. These bars do not require reheating, but if they become too firm, let them sit at room temperature for a few minutes before enjoying.
Variations and Customizations
This recipe is incredibly versatile, making it easy to tailor to your preferences. For a richer chocolate flavor, you can use dark chocolate instead of semi-sweet. It gives the bars a slightly more intense and less sweet profile.
If you have a nut allergy or prefer a different taste, swap the peanut butter with almond butter or sunflower seed butter. I tried almond butter once, and it added a subtle, nutty sweetness that worked beautifully.
For added texture, mix in chopped nuts like almonds or hazelnuts. This gives the bars an extra crunch and makes them feel more indulgent.
You can also include dried fruits such as cranberries or raisins for a chewy contrast to the crispy cereal.
To make it more dessert-like, drizzle melted white chocolate over the top before chilling. It adds visual appeal and an extra layer of sweetness.
For a healthier twist, use unsweetened chocolate and reduce the honey slightly. You can also opt for natural peanut butter without added sugar.
These bars are easy to adapt, so feel free to experiment with flavors and textures based on what you have at home.
Nutrition and Dietary Info
| Nutrient | Per Serving |
|---|---|
| Calories | 210 kcal |
| Protein (g) | 5 g |
| Carbs (g) | 20 g |
| Fat (g) | 13 g |
| Saturated Fat (g) | 6 g |
| Fiber (g) | 2 g |
| Sugar (g) | 12 g |
| Sodium (mg) | 95 mg |
These bars are vegetarian-friendly and can be adapted for gluten-free diets by using certified gluten-free cereal.
Expert Tips & Customizations
Use good-quality chocolate
High-quality chocolate enhances both flavor and texture significantly.
Do not overheat the chocolate
Melt gently to avoid burning or seizing.
Fold gently
Keeping the cereal intact ensures maximum crunch.
Press firmly into the pan
This helps the bars hold together when slicing.
Chill completely before cutting
This ensures clean edges and perfect shape.
FAQs
Can I use a different cereal?
Yes, cornflakes or puffed rice can work, but the texture may vary slightly.
Can I make these bars vegan?
Absolutely, use dairy-free chocolate and replace honey with maple syrup.
How long do they need to set?
Typically 1 to 2 hours in the refrigerator is enough for firm bars.
Can I freeze these bars?
Yes, they freeze well for up to 2 months. Thaw in the fridge before serving.
Why are my bars falling apart?
They may need more binding ingredients or firmer pressing before chilling.
Can I reduce the sweetness?
Yes, use dark chocolate and reduce the honey for a less sweet version.
Conclusion
These No-Bake Chocolate Crunch Bars are the perfect combination of simplicity and indulgence. With just a handful of ingredients and minimal effort, you get a crunchy, chocolatey treat that is hard to resist. Whether you are making them for a party, a snack, or just to satisfy a craving, they are guaranteed to impress. Once you try them, you will see just how easy and delicious homemade treats can be.
Hungry for more? Visit our website for full recipes and follow us on Pinterest for daily foodie inspo you’ll love to pin!