Introduction
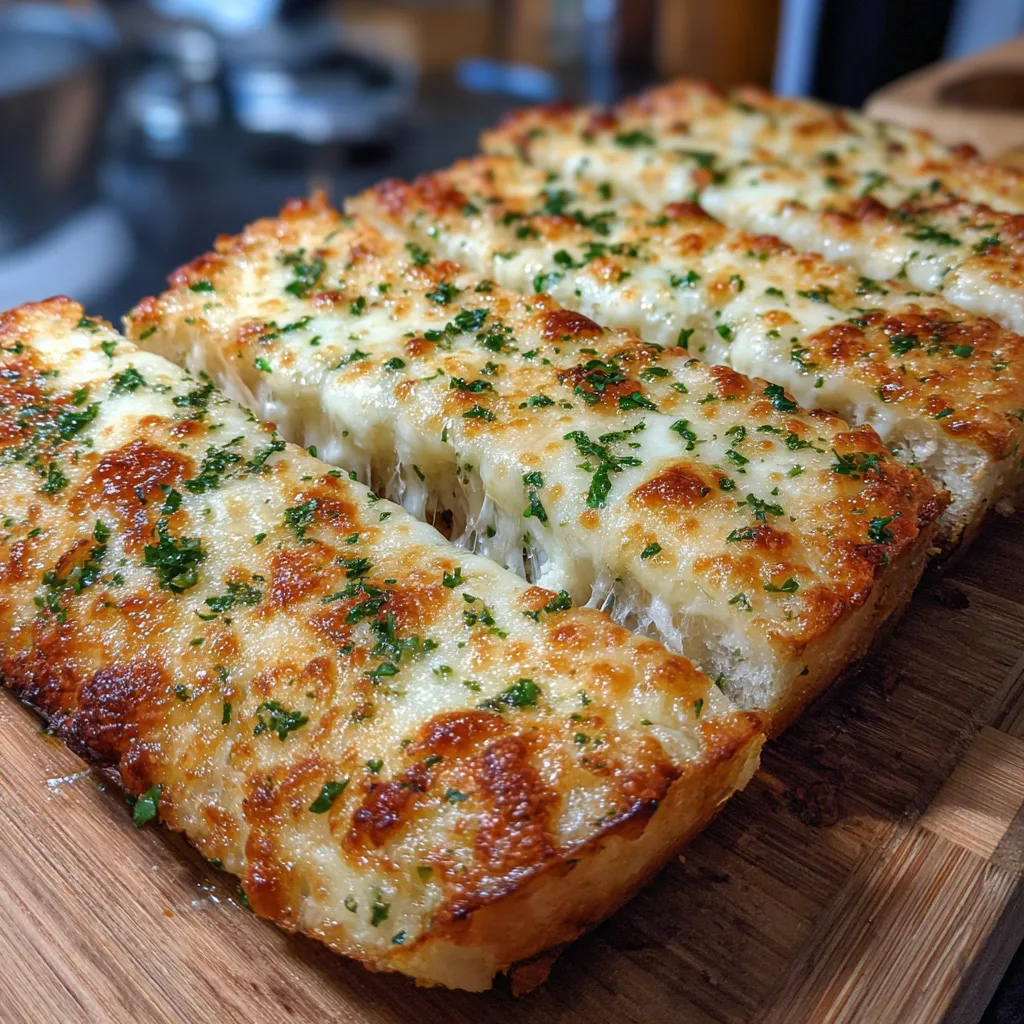
Few things are as comforting and universally loved as cheesy garlic bread. With its crispy edges, soft buttery center, and layers of melted cheese infused with fragrant garlic, this simple side dish often steals the spotlight from the main course. I remember the first time I made it at home—I added a touch of mozzarella and cheddar together, and the stretchy, gooey texture was absolutely perfect.
What makes cheesy garlic bread so special is how effortlessly it comes together while delivering bold, satisfying flavor. Whether you serve it alongside pasta, soup, or enjoy it as a snack on its own, it never disappoints. The aroma alone, as it bakes in the oven, is enough to make everyone gather in the kitchen. Once you try this homemade version, you may never go back to store-bought again.
Print
Cheesy Garlic Bread – Golden, Buttery, and Irresistibly Melty
- Total Time: 22 minutes
- Yield: 4 servings
- Diet: Vegetarian
Description
Golden, crispy cheesy garlic bread loaded with buttery garlic flavor and melted cheese—perfect as a side dish or snack.
Ingredients
- 1 baguette or loaf of bread
- 3 tablespoons butter, softened
- 2 tablespoons olive oil
- 4 cloves garlic, minced
- 1 cup shredded mozzarella cheese
- 1/4 cup grated parmesan cheese
- 2 tablespoons fresh parsley, chopped
- 1/2 teaspoon salt
- 1/2 teaspoon dried oregano
Instructions
- Preheat oven to 180°C (350°F).
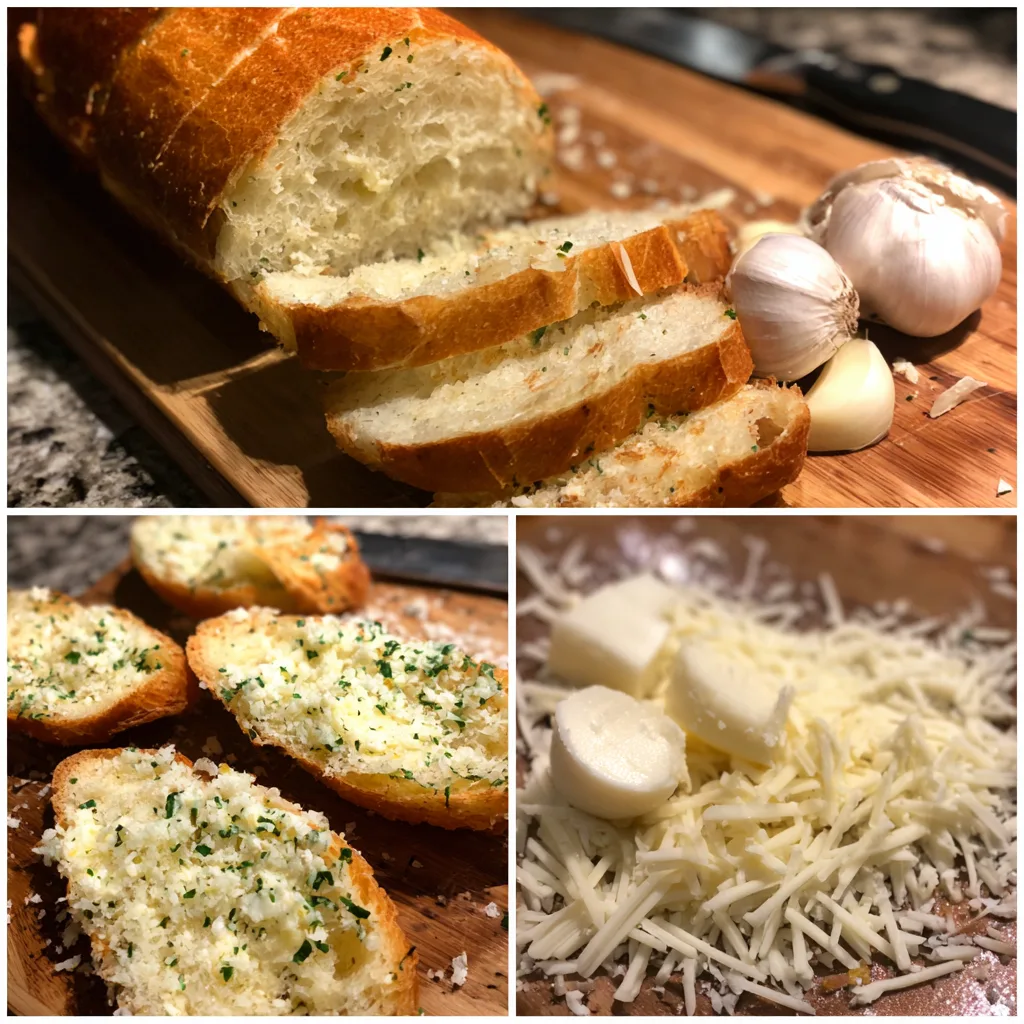
- Slice the bread in half lengthwise.
- In a bowl, mix butter, olive oil, garlic, salt, and oregano.
- Spread the garlic butter mixture evenly over the bread.
- Sprinkle mozzarella and parmesan cheese on top.
- Place on a baking sheet and bake for 10-12 minutes until cheese is melted.
- Broil for 1-2 minutes until golden and bubbly.
- Remove from oven and sprinkle with fresh parsley.
- Slice and serve warm.
Notes
- Use fresh garlic for best flavor.
- Adjust cheese types to your preference.
- Keep an eye while broiling to avoid burning.
- Add chili flakes for a spicy kick.
- Best served immediately.
- Prep Time: 10 minutes
- Cook Time: 12 minutes
- Category: Side Dish
- Method: Baked
- Cuisine: Italian
Why You’ll Love This Recipe
This recipe is quick, incredibly flavorful, and delivers the perfect combination of crispy bread, buttery garlic, and gooey melted cheese.
Ingredients
(Tip: You can find the complete list of ingredients and their measurements in the recipe card below.)
baguette or Italian bread
A crusty loaf works best, providing a crisp exterior while staying soft inside after baking.
butter
Softened butter creates a rich, spreadable base that soaks into the bread beautifully.
garlic cloves
Fresh garlic delivers bold, aromatic flavor that defines this classic dish.
mozzarella cheese
Mozzarella melts smoothly and creates that irresistible stretchy texture.
cheddar cheese
Adds a sharper flavor and enhances the golden, bubbly top.
parsley
Fresh parsley brings a light, herbal freshness that balances the richness.
olive oil
A small drizzle enhances moisture and adds a subtle depth of flavor.
salt
Enhances all the ingredients and brings out the garlic flavor.
Directions
Preheat your oven to 200°C. Slice the baguette or Italian bread in half lengthwise and place it on a baking tray, cut side facing up.
In a bowl, mix the softened butter with minced garlic, chopped parsley, olive oil, and a pinch of salt until well combined. Spread this mixture evenly over the bread halves, ensuring every corner is covered.
Sprinkle a generous layer of mozzarella and cheddar cheese over the buttered bread. Make sure the cheese is evenly distributed for consistent melting.
Place the bread in the oven and bake for about 10–12 minutes, or until the cheese is fully melted and bubbly. For a golden, slightly crispy top, switch to broil for the last 1–2 minutes, watching carefully to avoid burning.
Remove from the oven, let it cool slightly, then slice into pieces and serve warm.
Equipment needed : Must-Have Tools to Get Rolling
Here’s what you’ll want to have on hand:
Silicone Spatula – Durable, heat-resistant silicone spatula perfect for mixing, scraping, and spreading. Gentle on non-stick cookware and easy to clean.
Large pot – You’ll need this to boil the whole cabbage head and soften the leaves.
large bowl –Spacious, durable large bowl ideal for mixing, serving, or food preparation. Made from sturdy material and easy to clean.
Sharp knife – For coring the cabbage and slicing out the thick stem in each leaf. A paring knife works best.
Mixing bowl – A big bowl makes it easier to combine your meat and rice filling evenly.
Cutting board – For prepping cabbage leaves and rolling them like a pro.
Full-Size Blender – is a powerful kitchen appliance for making smoothies, soups, and sauces in large batches.
3-in-1 Air Fryer – This versatile 3-in-1 air fryer offers Air Fry for healthier meals with less oil, Bake for bakery-quality desserts and treats, and Reheat to bring leftovers back to life with crispy, flavorful results
Servings and timing
This recipe serves 4–6 people, with a preparation time of 10 minutes and a cooking time of 12 minutes, totaling about 22 minutes.
Storage/reheating
Store leftover cheesy garlic bread in an airtight container in the refrigerator for up to 2 days. Reheat in the oven at 180°C for 5–7 minutes to restore crispiness. Avoid microwaving, as it can make the bread soft and chewy.
Variations and Customizations
Cheesy garlic bread is incredibly versatile, allowing you to experiment with flavors and textures. If you prefer a stronger garlic taste, you can roast the garlic beforehand for a deeper, slightly sweet flavor. For extra richness, try adding a layer of cream cheese beneath the shredded cheese—I tested this once, and it made the bread even more indulgent.
You can switch up the cheeses depending on your preference. Parmesan adds a salty, nutty finish, while provolone gives a smooth, mild melt. Mixing different cheeses often results in the best texture and flavor combination.
For a spicy twist, add chili flakes or a drizzle of hot sauce before baking. This creates a subtle heat that pairs beautifully with the creamy cheese.
If you want a more gourmet version, top the bread with caramelized onions, mushrooms, or even cooked chicken pieces. These additions turn a simple side into a satisfying appetizer.
For a healthier option, use whole grain bread and reduce the butter slightly while increasing herbs for flavor.
You can also make it dairy-free by using plant-based butter and cheese alternatives, which still deliver great taste and texture.
Nutrition and Dietary Info
| Nutrient | Per Serving |
|---|---|
| Calories | 320 kcal |
| Protein | 10 g |
| Carbs | 28 g |
| Fat | 18 g |
| Saturated Fat | 9 g |
| Fiber | 2 g |
| Sugar | 2 g |
| Sodium | 480 mg |
Expert Tips & Customizations
Use fresh garlic
Fresh garlic provides the strongest and most authentic flavor.
Do not overload butter
Too much butter can make the bread soggy instead of crisp.
Broil carefully
Watch closely when broiling to avoid burning the cheese.
Mix cheeses
Combining cheeses creates better flavor and texture.
Serve immediately
Cheesy garlic bread tastes best when hot and freshly baked.
FAQs
Can I use pre-minced garlic?
Yes, but fresh garlic offers a more vibrant and authentic taste.
What bread works best for this recipe?
Baguette or Italian bread is ideal due to its texture and structure.
Can I make this ahead of time?
Yes, assemble it ahead and bake just before serving.
How do I make it extra crispy?
Bake longer or toast the bread slightly before adding toppings.
Can I freeze cheesy garlic bread?
Yes, freeze it before baking and cook directly from frozen.
Can I add other toppings?
Absolutely, try herbs, meats, or vegetables for added flavor.
Conclusion
Cheesy garlic bread is the ultimate side dish that combines simplicity with bold, satisfying flavor. With its crispy base, buttery garlic spread, and melted cheese topping, it is guaranteed to be a crowd favorite. Easy to make and endlessly customizable, this recipe is one you will return to whenever you need a quick and delicious addition to your meal.
Hungry for more? Visit our website for full recipes and follow us on Pinterest for daily foodie inspo you’ll love to pin!