Introduction
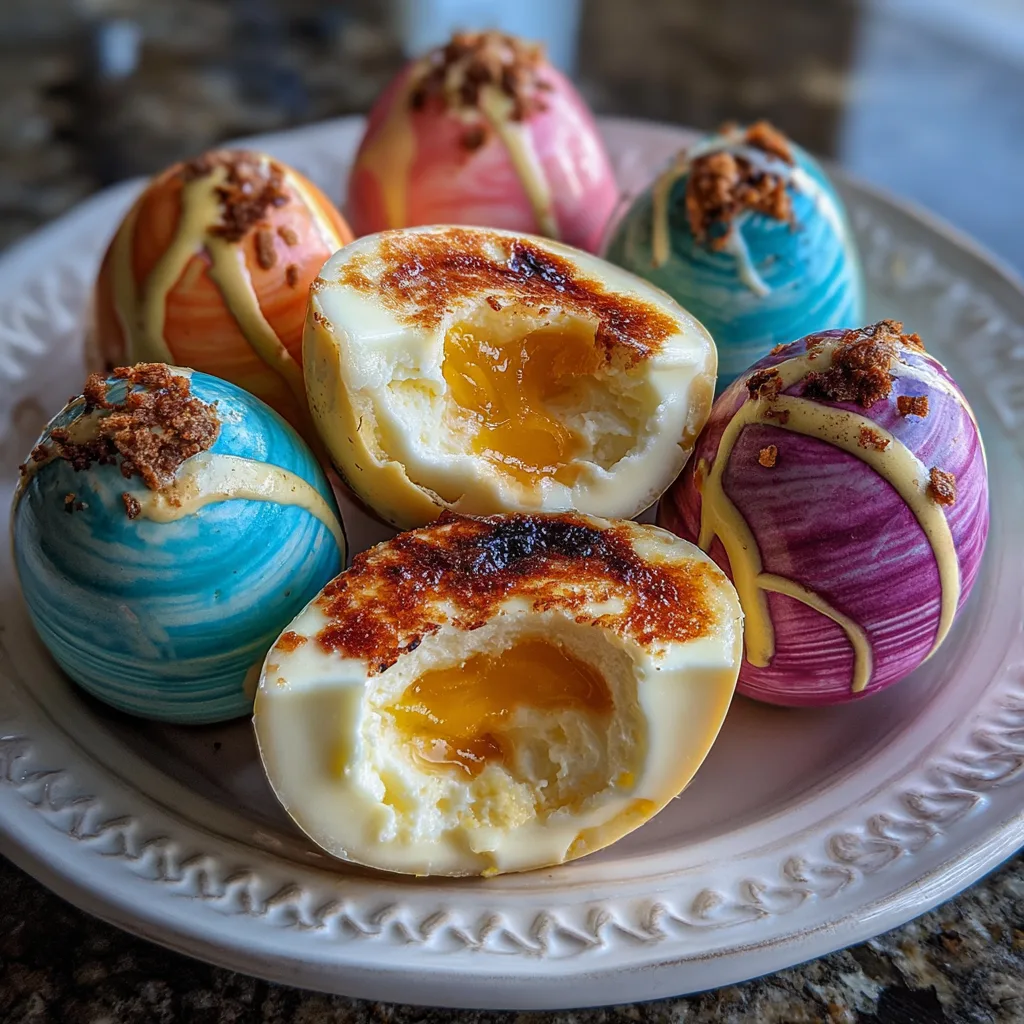
If you are looking for a fun and festive dessert that instantly captures the spirit of spring, these Cheesecake-Filled Easter Eggs are a perfect choice. They combine the rich, creamy texture of cheesecake with a playful chocolate shell shaped like Easter eggs. The first time I made these, I added a hint of vanilla and a touch of lemon zest, and the balance of flavors turned out absolutely delightful.
What makes this recipe so special is its no-bake simplicity and eye-catching presentation. The smooth cheesecake filling pairs beautifully with the crisp chocolate exterior, creating a dessert that is both indulgent and refreshing. These treats are perfect for Easter celebrations, gifting, or simply enjoying a creative twist on classic cheesecake. They are easy to customize and guaranteed to impress anyone who tries them.
Print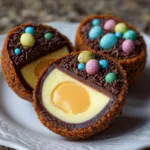
Cheesecake-Filled Easter Eggs: Creamy, Festive, and Irresistibly Sweet
- Total Time: 1 hour 20 minutes
- Yield: 6 servings
- Diet: Vegetarian
Description
A fun and festive no-bake dessert featuring chocolate Easter eggs filled with a creamy cheesecake mixture, perfect for holiday treats.
Ingredients
- 6 large hollow chocolate Easter eggs
- 200 g cream cheese, softened
- 1/2 cup powdered sugar
- 1 teaspoon vanilla extract
- 1 cup whipped cream or whipped topping
- 1/4 cup crushed graham crackers or biscuits
- Fresh berries or mini chocolate eggs for topping (optional)
Instructions
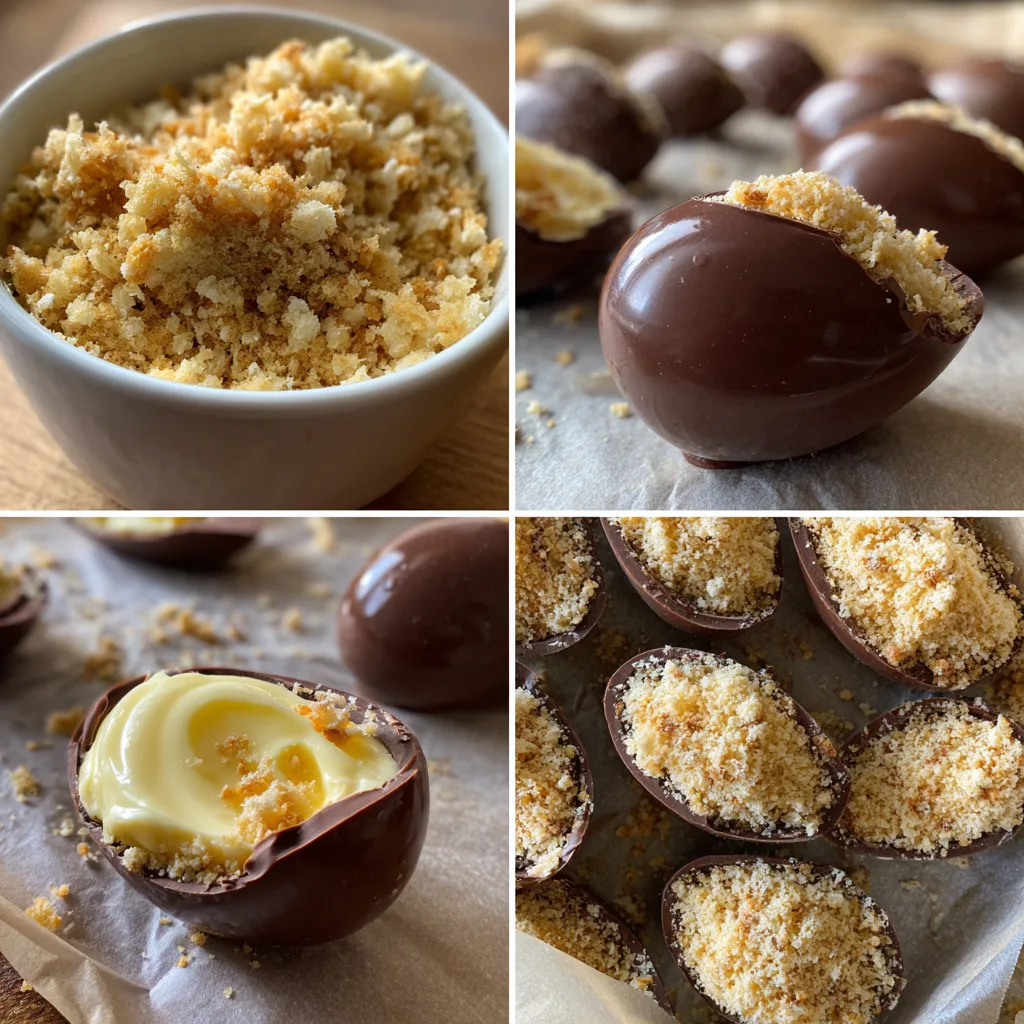
- Carefully cut or open the tops of the chocolate eggs to create a hollow space.
- In a bowl, beat cream cheese, powdered sugar, and vanilla until smooth.
- Fold in whipped cream until light and fluffy.
- Spoon or pipe the cheesecake filling into each chocolate egg.
- Sprinkle crushed graham crackers on top for a crust-like texture.
- Add optional toppings like berries or mini chocolate eggs.
- Refrigerate for at least 1 hour to set.
- Serve chilled.
Notes
- Handle chocolate eggs gently to avoid cracking.
- Chill before serving for best texture.
- You can flavor the filling with lemon or chocolate.
- Best enjoyed within 1–2 days.
- Prep Time: 20 minutes
- Cook Time: 0 minutes
- Category: Dessert
- Method: No-Bake
- Cuisine: International
Why You’ll Love This Recipe
These cheesecake-filled Easter eggs are creamy, no-bake, fun to make, and perfect for festive spring celebrations.
Ingredients
(Tip: You can find the complete list of ingredients and their measurements in the recipe card below.)
Cream cheese forms the base of the filling, giving it a rich and smooth cheesecake texture.
Powdered sugar sweetens the mixture while keeping it silky and lump-free.
Vanilla extract adds warmth and enhances the cheesecake flavor.
Lemon zest (optional) provides a subtle freshness that balances the richness.
Heavy cream helps create a light and fluffy consistency in the filling.
Chocolate (milk or dark) is used to form the egg shells, adding a crisp outer layer.
Butter adds richness and smoothness to the filling.
Crushed biscuits or graham crackers bring a slight crunch and mimic a cheesecake crust.
Sprinkles or decorations (optional) add a festive and colorful finish.
Directions
Start by melting the chocolate gently over a double boiler or in the microwave. Once smooth, brush or spoon the melted chocolate into egg-shaped molds, ensuring an even coating. Chill in the refrigerator until firm.
In a mixing bowl, beat the cream cheese, powdered sugar, and butter until smooth and creamy. Add vanilla extract and lemon zest if using, mixing until well combined.
In a separate bowl, whip the heavy cream until soft peaks form, then gently fold it into the cream cheese mixture to create a light, fluffy filling. Stir in the crushed biscuits for added texture.
Remove the chocolate shells from the molds and fill each half with the cheesecake mixture. Carefully join two halves together to form a complete egg, sealing the edges with a little melted chocolate if needed.
Chill the assembled eggs for at least 1 hour to set. Once firm, decorate with additional melted chocolate, sprinkles, or drizzle for a festive look.
Equipment needed : Must-Have Tools to Get Rolling
Here’s what you’ll want to have on hand:
Silicone Spatula – Durable, heat-resistant silicone spatula perfect for mixing, scraping, and spreading. Gentle on non-stick cookware and easy to clean.
Large pot – You’ll need this to boil the whole cabbage head and soften the leaves.
large bowl –Spacious, durable large bowl ideal for mixing, serving, or food preparation. Made from sturdy material and easy to clean.
Sharp knife – For coring the cabbage and slicing out the thick stem in each leaf. A paring knife works best.
Mixing bowl – A big bowl makes it easier to combine your meat and rice filling evenly.
Cutting board – For prepping cabbage leaves and rolling them like a pro.
Full-Size Blender – is a powerful kitchen appliance for making smoothies, soups, and sauces in large batches.
3-in-1 Air Fryer – This versatile 3-in-1 air fryer offers Air Fry for healthier meals with less oil, Bake for bakery-quality desserts and treats, and Reheat to bring leftovers back to life with crispy, flavorful results
Servings and timing
This recipe makes about 8 to 10 Easter eggs, with a preparation time of 25 minutes and chilling time of 1 to 2 hours.
Storage/reheating
Store the eggs in an airtight container in the refrigerator for up to 4 days, and serve chilled for the best texture.
Variations and Customizations
These Cheesecake-Filled Easter Eggs are incredibly versatile and fun to customize. For a chocolate lover’s version, you can mix cocoa powder or melted chocolate into the cheesecake filling. I tried this once, and it created a rich, double-chocolate treat that was hard to resist.
If you prefer a fruity twist, consider adding strawberry or raspberry puree to the filling. This adds a fresh flavor and a beautiful color contrast inside the eggs.
For a lighter option, you can use whipped topping instead of heavy cream, which still creates a fluffy texture with less richness.
You can also experiment with different chocolate types for the shell. White chocolate creates a sweeter, more decorative base, while dark chocolate adds a slightly bitter contrast.
For extra texture, add chopped nuts or chocolate chips into the filling. These small additions make each bite more interesting and satisfying.
Nutrition and Dietary Info
| Nutrient | Per Serving |
|---|---|
| Calories | 290 kcal |
| Protein | 4 g |
| Carbs | 28 g |
| Fat | 18 g |
| Saturated Fat | 10 g |
| Fiber | 1 g |
| Sugar | 22 g |
| Sodium | 160 mg |
Expert Tips & Customizations
Use room temperature cream cheese
Ensures a smooth, lump-free filling.
Chill chocolate shells properly
Prevents breaking when removing from molds.
Fold cream gently
Maintains a light and airy texture.
Seal edges carefully
Keeps the eggs intact and neat.
Decorate creatively
Enhances presentation and fun factor.
FAQs
Can I make these ahead of time?
Yes, they can be made a day or two in advance and stored in the fridge.
Can I use store-bought chocolate shells?
Yes, it saves time and works just as well.
How do I prevent the shells from breaking?
Ensure the chocolate layer is thick enough and fully set.
Can I freeze these eggs?
Freezing is not recommended as it may affect texture.
Can I use low-fat cream cheese?
Yes, but the texture may be slightly less rich.
Are these suitable for kids?
Yes, they are fun, sweet, and perfect for children.
Conclusion
These Cheesecake-Filled Easter Eggs are the perfect combination of creativity and indulgence. With their creamy filling, crisp chocolate shell, and festive appearance, they bring joy to any celebration. Easy to make and endlessly customizable, this recipe is a delightful way to elevate your Easter dessert table.
Hungry for more? Visit our website for full recipes and follow us on Pinterest for daily foodie inspo you’ll love to pin!